A MAV InterCity Train basks under sodium and mercury vapor light at Budapest Keleti Station; exposed with a Nikon F3T and f.1.8 105mm lens on Fujichrome.
Following the Ghost of the old Hapsburg Empire
I selected this image of Budapest Keleti Station as part of a exhibition of more than twenty of my photographs titled Silver & Steel that made its debut in November 2008 at the GONe Studio. I exposed it at the beginning of an Eastern European rail adventure that ultimately brought me across Hungary, through Romania to Vlad Tepe’s birthplace, over the Carpathians and then into eastern Ukraine. Keleti or ‘Eastern’ Station is a principle Hungarian terminus for international rail travel; it’s a classic railway temple featuring a magnificent train shed that faces the city through an enormous fan-shaped window.
The trick to getting this dramatic angle was working my old Nikon F3T with its detachable prism. I focused manually, then removed the prism, and laid the camera on the platform, fine-tuning composition looking down on the mirror image while using a combination of Euro coins to prop up the lens. During exposure, I used my notebook to shade the front element from flare. To minimize vibration, I set the self-timer and stood back. My faithful Minolta IV light meter was key to calculating base exposure, but I then added a full stop to compensate for the cavernous quality of the train shed and the film’s reciprocity failure (owing to long exposure time). I made several exposures, most of which came out blurred because of nominal camera vibration. Ultimately, I locked up the F3T’s mirror for this final image.
Norfolk Southern’s former Nickel Plate Road mainline from Buffalo to Cleveland navigated 19th Street in Erie, Pennsylvania. This unusually long section of street trackage offered some great photographic opportunities. In October 1994, I was visiting Erie on my way from West Virginia to Wisconsin, and I made this image of a lone NS GP59 leading a westward double-stack train down 19th Street. The soft light of a dull day works well here by allowing the texture and hues of autumnal foliage to offer the illusion of a long corridor, with effect of haze giving added depth. The train seems endless. I was working with a Nikormat FT3 with Nikkor f4.0 200mm lens on a Bogen tripod and Fujichrome 100 slide film.
This street trackage was sacrificed as a condition of the Conrail split in the late 1990s. To eliminate the slow running and please unsympathetic neighbors of the railroad, NS shifted its operations through Erie to the parallel former New York Central grade-separated line (owned and operated by CSX after the 1998-1999 split.)
Broadstone Station, Dublin greets the new millennium. Rollei Model T with f3.5 75mm Zeiss Tessar lens.
Broadstone Station was the Dublin terminus of Ireland’s Midland & Great Western Railway. This enigmatic railway was built west from Dublin parallel to the suffering Royal Canal, and Broadstone Station was located adjacent to the existing Royal Canal basin in the north city center. M&GWR was among lines consolidated as Great Southern Railways in 1924, a move that sealed the fate of Broadstone; it was closed as a passenger terminal in 1936 (although tracks remained for freight services into the 1970s). The buildings survive as a Dublin Bus depot (garage). The old canal basin was filled in many years ago and is now car park. The canal bridge that once spanned the road adjacent to the station is remembered in period photos on the walls of neighborhood pubs. Soon rails will return to Broadstone in the form of a LUAS light rail extension.
Broadstone Station is a vestige of Irish railways long gone. The station was executed in an Egyptian revival style and completed in 1850. I find the building fascinating, yet difficult to photograph because it is hemmed in by the five inhibitors of urban railway photography: pavement, walls, fences, wires and unkempt brush. On a weekday, cars and buses surround the old structure, which lend to ironic images of a grand decayed station encircled by transport modes that contributed to its redundancy. Making a simple image that captures the grandeur of the station isn’t easy. Here are two of my efforts: one was made with my old Rollei Model T on 120 size black & white film on January 3, 2000. I exposed the other digitally last Tuesday afternoon (February 19, 2013) using my Canon 7D and 40mm pancake lens.
Dublin’s Broadstone Station, February 19, 2013. Exposed with Canon 7D fitted with 40mm pancake lens.
General Motors Electro-Motive Division SD40-2 is classic North American locomotive design. This rugged, powerful, and reliable model was built in the thousands between 1972 and the early 1980s. Its essential boxy utilitarian form shares the same functional appearance common to most of EMD’s American road-freight locomotives built from 1963 until the general proliferation of Safety-Cab designs in the early 1990s. Canadian Pacific ordered large numbers of SD40 and SD40-2s from General Motors Canadian subsidiary and these were its dominant road locomotive for the better part of two decades. In the early 2000s, they remained standard on CP’s Delaware & Hudson lines in New York and Pennsylvania.
Canadian Pacific’s classic 1970s ‘Pac-Man’ icon on the rear hood of SD40-2 5952. Exposed with a Nikon F3 fitted with f2.0 135mm lens. Fujichrome Astia 100F slide film.
On October 12, 2003, I made a series of photographs of Canadian Pacific SD40-2s on a southward/westward freight at Delaware & Hudson’s Bevier Street Yard in Binghamton, New York. Here the locomotives were paused in nice light giving ample opportunity to make photographs from different angles. I was working with a pair of Nikon F3s (one F3HP, one F3T), and a Contax G2 rangefinder fitted with an unusual super wide-angle lens. Displayed here are a few of my results. The broadside Contax view at the bottom of the post was among the images featured in my recently published North American Locomotives by Voyageur Press.
Canadian Pacific’s classic 1970s ‘Pac-Man’ icon on the rear hood of SD40-2 5952. Exposed with a Nikon F3 fitted with f1.8 105mm lens.Broad side view of Canadian Pacific SD40-2 6007 at Bevier Street Yard in Binghamton, New York. Exposed with a Contax G2 rangefinder with 16mm Hologon lens. (This is a flat field design to obviate barrel distortion).
Before boarding the eastward České Dráhy train IC540 Hutnik at Olomouc for Prague, I bought a few bottles of famous Czech beer to improve my passage. Unlike amply fitted passenger carriages in the Ukraine, CD appears to expect their passengers will supply their own bottle openers. I improvised. Near Kolin I made this image with my Canon EOS-3 and 24mm lens. I focused and exposed manually, using my Minolta Mark IV handheld light meter. Fuji Provia 100F was the media for recording. Since my bottle of Gambrinus was the topic of the moment, I opted for select focus. Not all railway images need to center on trains.
White tram at Bus Aras, Dublin. February 19, 2013. Canon 7D with 40mm pancake lens.
White tram near Bus Aras, Dublin. February 19, 2013. Canon 7D with 40mm pancake lens.
The majority of trams on Dublin’s LUAS network are dressed in light silvery lavender with yellow safety strips around the body of the cars roughly at headlight level. The yellow stripe was added after the 2004 LUAS start up. Every so often, a single tram is decorated in an advertising livery. Last autumn (2012) there was an attractive blue tram advertising a cable television service. The other day, I noticed an all white tram advertising a phone service. This is like the one red jellybean in a bag of black ones. It’s something to watch out for and relieves the monotony of an otherwise uniform fleet. For photography it opens up opportunity to catch something a little different. After all, what can white do that silver cannot?
Ordinary LUAS tram catches the glint at Bus Aras, Dublin. February 19, 2013. Canon 7D with 40mm pancake lens.
An Irish Rail six-piece Intercity Railcar works down road at milepost 4 1/4 near Clondalkin. Canon 7D with 100 f2.0 lens. ISO 200 1/500th second at f5.6.
This morning (February 21, 2013), Dublin dawned frosty and dull. On Thursdays, Irish Rail runs a pair of intermodal freight liners between Dublin port and Ballina, County Mayo for shipping company IWT (International Warehousing and Transport). Today, the first of the two IWT Liners (as the freights are generally known) departed the yards at the North Wall just after 9:31 am. As it was led by a common 201-class diesel and the weather remained especially dull outside, I opted to let it pass undocumented, as I’ve often photographed this train in nice light. The second train, however, was running with Irish Rail 074, one of the 1970s-era General Motors-built 071 class diesels, which is of greater interest to me. So this afternoon, my friend Colm O’Callaghan and I went to a favored spot near Clondalkin in the western suburbs at milepost 4 ¼ , where we waited patiently in Baltic conditions. While the temperature was a balmy 3 degrees Celsius (about 37 Fahrenheit), the biting wind and general dampness made it feel much colder. Just ten days ago I was out in much colder conditions at Palmer, Massachusetts (USA), where it was about -17 degrees Celsius (1 degree Fahrenheit), and it hadn’t felt so bad. There’s nothing like a raw Irish day to cut through you.
Irish Rail 074 leads the second Dublin-Ballina IWT liner near Clondalkin on February 21, 2013 at 1:20 pm. Canon 7D with 40mm pancake lens; ISO 200 1/500th at f5.0.
Clondalkin is on the short stretch of quad-track mainline between Cherry Orchard (no cherries near the place!) and Hazelhatch that was expanded from the old double-line at the end of the Celtic Tiger-era boom years. The slight curve at the end of a long tangent in an area of industrial estates makes for an interesting setting to capture trains on the roll. However, it isn’t the nicest place to stand around exposed on a cold day. Complicating photography are high palisade fences and other fencing on the bridge that requires some creative solutions to overcome. While waiting for the down IWT liner, we witnessed the usual parade of passenger trains, all running to time, on the new Irish Rail time table.
The mildly overcast conditions encouraged us to make a cross-lit view of the liner from the north side of the line, rather than the more traditional three-quarter angle from the south side. I like the north side view on a dull day because it offers a better angle on the quad track and signaling.
A Dublin LUAS tram hums along Benburb Street heading toward Heuston Station. The Easter-like colors on the tram make for a cool comparison with those in the background on the Museum of Decorative Arts & History in the old Collins Barracks. Canon 7D with 40mm pancake lens. ISO 200 f18 at 1/60th second. (Full frame without cropping or post processing adjustment except scaling for internet viewing.)
Practice panning. I’ve found this increases the ratio of success. Trams are good subjects for practicing. They come by a frequently and at regular intervals. They operate in urban environments with interesting backgrounds. If one set of pans isn’t satisfactory, no problem, there’ll be another tram along shortly. Also, trams tend to be double-ended, allowing opportunities for panning coming and going.
Dublin is blessed with a modern tram system. The LUAS is well suited (and aptly named— translated from the Irish roughly means ‘speed’) for panning. LUAS Citadis trams built are by Alstom, and are a standard European model. I find these reasonably photogenic, so far as trams go and they glide along smoothly. Over the years I’ve made a variety of LUAS pans. I exposed this pair of tram pans yesterday afternoon (February 18, 2013) along Dublin’s Benburb Street using my Canon 7D fitted with 40mm Pancake lens (which as result of the 7D’s smaller sensor size provides a 35mm film camera equivalent of about 60mm lens)
Here’s a few tips for making clean pan photos:
1) Use a 50mm lens or short telephoto. (Making pan photos with wide-angles and long telephotos is much more difficult)
2) Manually select a shutter speed between 1/15th and 1/60th of a second. (the longer the shutter is open, the greater the effect of blurring, but the harder it is to obtain a clean pan).
3) Make a series of experimental photos to practice the panning motion.
4) Pan by pivoting the entire body.
5) Pick a point in the frame to line up with the subject; try to hold the subject to that point during the entire pan.
6) Begin panning well before the subject is photographed and plan to continue panning until well after the shutter is released. Don’t stop suddenly.
7) If using an SLR/DSLR, plan on making a single frame and not a series of motor drive exposures. (The mirror flapping up and down is distracting and may simply result in a series of badly blurred images instead of a single sharp one).
8) Pay careful attention to the background and how it relates to your subject.
9) Repeat steps 1 to 8 as often as is practicable.
I’ll divulge a few more panning tricks in a later post.
A LUAS Tram passes the Millennium Bar on Benburb Street. This was the location of the well-publicized tram crash on September 10, 2012, that I featured in a post on that day. See: LUAS Tram Crash on Benburb, Street Dublin. Canon 7D with 40mm pancake lens. ISO 100 f18 at 1/15th second. (Full frame without cropping or post processing adjustment except scaling for internet viewing.)
Irish Rail ICR near Islandbridge, Dublin, February 18, 2013. Canon 7D with 40mm pancake lens; ISO 200, f11 at 1/30th second.
Here’s a panned view of an Irish Rail intercity railcar near Islandbridge, Dublin that I exposed a little while ago (February 18, 2013). A pan of a 22K-series ICR? No, this isn’t a litany of complaint regarding the common Rotem-built Irish Rail intercity vehicle. Rather, it’s an example of one of my favorite techniques for showing motion. I learned to pan from my father, who used the technique to compensate for slow speed Kodachrome film. In the early 1960s, he made some stunning rainy-day images of Pennsylvania Railroad’s Baldwin ‘Sharknose’ diesels working the New York & Long Branch. Check my Vintage Diesel Power by Voyageur Press to view some of these photos.
The trick to making a successful pan is to manually select a moderately slow shutter speed (1/15th to 1/60th of a second), then follow a train with the camera, gently releasing the shutter at an appropriate moment. I find that pivoting my whole body helps makes for smoother motion. Key to this exercise is planning to continue the panning motion after the shutter is released. Stopping too soon may result in unplanned blurring of the main subject. Also, I usually pick a fixed point in the frame to follow the front of the train. My Canon 7D has lines on the viewfinder screen that aids this effort. I’ll discuss the panning technique in greater detail in a future post.
Ireland’s Bord na Móna (Peat Board) was the topic of my post, Gallery 8: Irish Bog Railways—Part 1 in November 2012. Yesterday, February 16 2013, I made another exploratory trip into the bog. Where previous investigations focused on operations at Edenderry, County Offaly, this trip was to the network that serves the Lough Ree Power Station along the River Shannon at Lanesborough, County Longford. Among the peculiarities of Bord na Móna’s narrow gauge operations are its temporary sidings laid out on the bog for the purpose of loading trains. Until put in place, these tracks resemble those of an oversized model railway and are in fixed sections held together by steel sleepers (ties), and often stacked in piles awaiting installation. The bog itself is spongy and wet, thus ill suited to permanent infrastructure. Since temporary track is only used at very slow speed for short periods of time, niceties normally afforded railway lines, such as grading, leveling, and drainage, aren’t considered.
Bord na Móna feeder for temporary track near Mt Dillon, County Longford; exposed with a Canon 7D with f2.8 200mm lens; ISO 400, f4.5 1/640th second.
This telephoto view exaggerates the undulating quality of a roadside Bord na Mona spur used to access an area of bog ready for harvesting. This particular section of track may be left in place for years to tap short-lived harvesting spurs.
This photographic adventure is among my works in progress; I plan to display more images of Bord na Móna in upcoming posts.
Here’s another view from along the old Erie Mainline. Once common, the picket-fence effect of multiple-tier code lines along American mainlines has largely vanished in recent decades. These poles and wires are a vestige of another time, another era. Today, when wireless information reigns supreme, such archaic remnants remind us how much has changed. I exposed this view with my Canon EOS-3 and f2.8 200mm lens on Fujichrome. Will film soon go the way of the code line? Banished to realm of obscure obsolescence? Relegated to curiosity by newer technology—faster, easier, cheaper, and yet more ephemeral.
Here’s an unpublished image from my archive. In the gloom of early morning on April 7, 1989, I made the hour and 15 minute drive from Scottsville to Portage, New York to make time exposures of the old Erie Railroad Portage Viaduct. I featured this pioneering tower-supported viaduct in an earlier post (see: Erie Railroad’s Portage Bridge May 12 2007). Blessed by a stunning setting and significant history, the old Portage Viaduct has been a favorite subject on many occasions over the years. For this image, I used my Leica M2 rangefinder with 50mm Summicron lens to make a long exposure (about 8 seconds) in the pre-dawn twilight. The predominantly blue light combined with Kodachome’s spectral sensitivity to produce a near monochromatic view. The roaring Genesee falls have taken on an otherworldly ethereal quality, while the dark sky lends a nightmarish cast. This image exists only on film; at the time of exposure, it seemed very different to my eye. Later in the morning, an eastward Delaware & Hudson freight eased over the bridge at restricted speed; I followed this for several hours, making numerous images of it, mostly in black & white.
For years, friends have asked my advice on camera exposure, typically on-site with a train bearing down on us. Politely, I’ll offer suggestions—based on conditions, but such advice can be deceiving since conditions change quickly. For my photography, I often refine exposure as the scene unfolds. A train entering a scene may alter my anticipated exposure, which requires subtle adjustments at the last moment.
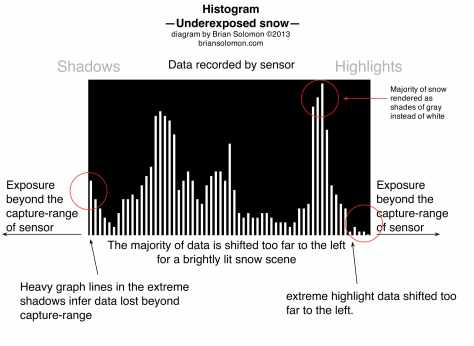
Using the camera’s histogram to judge exposure is part of my latest technique for refining exposure and making optimum use of the digital camera sensor. A histogram reflects exposure information collected by the sensor. This is displayed as a graph that offers exposure quantification: it shows the range of data recorded by the sensor and alludes to data lost. The histogram allows me to gauge when the scene is over- or under-exposed. It solves much of the guesswork previously necessary when shooting film, while providing real information by which to adjust future exposures. What it doesn’t tell me, is as important to what is displayed on the graph.
Using film, ‘over-exposure’ inferred that too much light reached the emulsion and resulted in an image that appears too bright, while ‘under exposure’ inferred that too little light, thus and a dark image. It was never as simple as that, but that’s good enough for the moment.
The advent of digital imaging combined with the ease of post-processing using digital technology has changed the definitions of exposure, so far as I’m concerned. I can now use information from camera sensor on-site to help capture the greatest amount of information.
This is not much different than my traditional approach to black & white photography. The new tools offered by modern digital cameras have altered my means for calculating exposure. More to the point; the need for obtaining desired visual balance between light and dark in-camera isn’t part of my exposure technique because the appearance of the exposed image in the thumbnail on the camera display doesn’t accurately reflect data collected, while the final image may be best refined after exposure.
Here’s a difference between film and digital: Film sensitivity is less definitive than with digital sensors; simply, the data accumulated during a digital exposure fits between definite parameters, while with film significantly more information may be retained than is readily visible to the naked eye. Beyond these limits with digital, data isn’t recorded (to the best of my understanding). Thus to obtain the greatest amount of visual information a digital exposure must be calculated to be carefully placed between the image’s deepest shadows and brightest highlights. The tool needed to gauge this decision is the camera’s histogram.
A histogram displays a series of lines progressing from dark to light. These lines reflect the number of pixels exposed in the various gradations. How this data is collected isn’t important for this exercise. Crucial, is the assessment of the histogram in order to make future exposures that don’t lose critical information in extreme highlight or shadow areas.
When I make snow photos, I expose in a manner to place the bulk of information toward the center of the graph. I pay close attention to highlight falloff. Losing detail in the brightest parts of distant clouds, or at the center of locomotive headlights isn’t a problem, but losing detail in snowy foreground is undesirable. Ideally, the graph will taper gently into the extremes, indicating the smallest degree of loss in the deepest shadows and brightest highlights.
The histogram is extremely useful when exposing bright snow scenes, because most camera automatic settings are not tuned to expose for large fields of white and tend to grossly misjudge a brightly lit and largely white scene. This typically results in under exposure which renders snow gray rather than white and, risks opaque shadows (a substantial loss of information). It renders many elements too dark (such as the train passing through the scene). However, a few modern digital cameras have ‘snow settings’ that should overcome these difficulties.
Before making my desired image sequence, I’ll make a series of test exposures to check the effect of camera settings. Based on information displayed by these graphs I’ll make exposure adjustments to place highlights and shadows appropriately. As my subject approaches, I’ll further refine my exposure by making adjustments in 1/3-stop increments. I’ll continue to compensate for exposure changes caused by the train entering the scene (including variations caused by locomotive headlights and ditch lights).
Displayed here are both hypothetical graphs to show how I read histograms, and images of the real graphs from my Canon 7D exposed in snowy scenes last Sunday, February 10, 2013. Both types of images are intended to illustrate how I’ve selected exposures.
I use the histogram feature all the time, but find it most useful in extreme situations. It has proved its value by eliminating uncertainties previously caused by the extremes of snow photography.
Some advice for the graph-adverse photographer working in snow: use the camera meter to gauge base exposure then override the meter by opening up by 2/3 of a stop (for example open from f11 to f9).
CSX light engines roll through CP83 at Palmer, Massachusetts on February 10, 2013.
I’m not talking about stripping down and running naked through the snow. That sounds like a recipe for frostbite, hypothermia or worse! Rather, I’m focused on how to best select exposure when working in winter situations. Snow is especially difficult to work with for several reasons. First, it’s abnormally bright and results in high contrast situations that is both difficult on the eyes and the camera sensor. Second, most camera meters aren’t designed to work with fields of white, so tend to recommend the wrong settings. Third, for many photographers, making images in snow is an infrequent experience, and one that tends to lead to uncertainty and higher rates of exposure error.
A blizzard blanketed the Berkshires with 3-4 feet of snow during second week of December 1992. On the morning of Dec 15, 1992, I caught a Conrail C36-7 leading a pair of SD40-2s on TV9 climbing westward through the deep cut at Washington, Massachusetts. While parking was difficult (drifts up to seven feet tall block all the usual spots, so I left the car in the road with its four-way lights flashing) the real challenge was selecting the best possible exposure for this backlit snow scene. The image was exposed using my Nikon F3T and f4.0 200mm lens. My exposure was about f5.6 1/250 second on Kodachrome 25.
My approach to snow photography stems from years of practice. In general, I take the information provided by camera meters as advisory. I rarely rely on automatic settings without some manual adjustment. Why? I’ve learned to carefully gauge exposure and apply settings manually. Furthermore, I’m distrustful of automatic metering, especially for railway photography, because the automation is programmed to deliver adequate imagery other than what I’m trying to achieve. Perhaps no other situation is as difficult for a common-meter to gauge as sunlit snow imaging.
Many years ago, my father lent me a Weston Master III, and instructed me to wander around the house making exposures and write them down. No photos were exposed. I was about nine and I found this exercise confusing and frustrating because I didn’t understand what I was supposed to be doing. However, I overcame frustration and learned to use the light meter. A decade later, I had the opportunity to learn Cibachrome printing (used to make vivid prints from color slides). At the time, I was primarily working with Kodachrome 25, which I’d been taught to nominally underexpose to produce more saturated colors.
Translating Kodachrome to Cibachrome was revealing; I’d found that my rich, slightly-underexposed slides, which when projected on a nice bright screen looked fantastic, were in fact rather difficult to print. The biggest issue was contrast. While under-exposure may have enhanced the color saturation, it also made the image more contrasty. So while it turned out that my old theory on underexposure had it flaws, I discovered that slightly overexposed slides printed very well. I needed to determine ideal exposures in order to make optimal slides.
Aiding my efforts was my notebook; I’d been recording my exposures for years, but with the Ciba exercise I began making even more detailed notes, recording slide exposures to the third of a stop. Eventually, I assembled a chart with ideal exposures for Kodachrome 25 in various lighting situations. In general, I’d discovered that to make prints, slides needed to be about 1/3 stop brighter than I’d been making them for projection. All very well, but what does this have to do with making digital images in the snow?
Exposing Kodachrome is history, but the lessons I learned from this material still apply. (The short answer to the question was that snow in bright daylight should be exposed at approximately 1 ½ stops down from the full daylight setting without snow; thus with Kodachrome 25, if my normal daylight setting was f4.5 1/250, my snow exposure was about f8 1/250 +/- 1/3 stop). Many of my slides have appeared in books, magazines, as well as here on Tracking the Light. Take a look at my recent book North American Locomotives for some top-notch printed reproductions of Kodachrome.
Digital photography offers some great advantages over Kodachrome, including the ability to review images on-site—thus removing the uncertainty of exposing slides and having to wait for days (or weeks) to see if your exposures were correct. It’s now easier than ever to make good snow exposures and learn immediately from miscalculation. Related to this is the ability to use a digital camera’s histogram as an on-site exposure tool.
Histogram? Yes! This is perhaps the greatest feature on my digital cameras. It allows me to set my exposure ideally, allowing key images to capture the greatest amount information, thus minimizing detail lost through unwanted under-or over-exposure. Positively invaluable when making images in the snow.
Sunday February 10, 2013, I made this image of New England Central GP38s climbing State Line Hill at the Route 32 crossing South Monson. Nearly 61 years ago, Bob Buck exposed an image of Central Vermont 2-8-0s 462 and 468 leading a southward freight from the same angle at this crossing. There were fewer trees back then! See page 66 of my North American Locomotives for a full page reproduction of Bob’s dramatic B&W photograph.
Today, before a train enters the scene, I’ll make a series of test exposures and judge them by the output of the histogram. This allows me to refine my exposure to a point that exceeds what I could have achieved with my detailed chart and Kodachrome. In my next post, I’ll detail this process with more examples.
On command, my Canon 7D offers a variety of useful information. Here’s the in-camera thumbnail of NECR’s GP38s crossing Rt32 in South Monson with relevant histogram as displayed on camera screen. Learning to interpret the graph is extremely useful in making exposures in difficult situations. While I’ve balanced the exposure to favor detail on the locomotives, I’ve managed to retain satisfactory levels of detail in the piles of snow both side of the tracks. The image was exposed using my Canon 40mm Pancake lens.
Shafts of morning sun illuminate exhaust from the Palmer yard office, while snow is blown from tracks at New England Central’s yard on February 10, 2013. Temperature = 0 Fahrenheit; image exposed digitally with a Canon 7D and 200mm lens; ISO 200.
The media loves storms; and they always have. New England’s first big snowfall of the on February 8th and 9th, seems to have made news everywhere. Friends from London called to say that the New England storm was a lead-in story on BBC.
New England Central at Washington Street, Monson—looking north before the storm, Friday February 8, 2013. Lumix LX-3 photo.Two days later: New England Central at Washington Street, Monson—looking north after the storm, Sunday February 10, 2013. Lumix LX-3 photo.
On the morning the snow began, I made a few photos at Washington Street in Monson with my Lumix LX-3 (for later comparison). Historically this was the site of Monson’s railway station, gone nearly 60 years now. Blankets of snow fell on Monson, Massachusetts through the day on Friday and into Saturday. I spent Saturday clearing off cars and whatnot, as you do after a heavy snowfall. The railroads were quiet, and a general ban on highway travel, plus dire road conditions discouraged me from going anywhere to make photos.
Churning blades of the snow-blower clearing Palmer yard. Canon 7D with 200mm lens.
Clearing New England Central’s Palmer Yard on February 10, 2013. Canon 7D with 200mm lens.New England Central’s Palmer Yard on February 10, 2013.
This morning (February 10, 2013) I aimed for Palmer, where it was clear and bright, but all of 1 degree Fahrenheit. Between 18 inches and 2 feet of snow covered the ground, with drifts several feet deep in places. Yes, it was a good dump, but not a record by my estimation. I’ve seen more snow.
Clearing New England Central’s yard was a bucket loader fitted with a snow blower. This made for a few impressive scenes, which I’ve tried to capture here. However, in general, traffic on the railways was quiet. CSX sent a set of light engines east. These stopped about a mile west of Palmer (milepost 84.5) because what I understood to be an axle problem with one of the General Electric locomotives. After a few minutes, these were on the move, and I made some views of CSX passing the old Palmer Union Station at CP83—now occupied by the Steaming Tender restaurant—a favorite eating place of mine.
Mid-morning on February 10, 2013, CSX light engines roll eastward passed CP83 in Palmer, Massachusetts. The old Palmer Union Station is now the Steaming Tender restaurant. Canon 7D with 28-135 zoom lens. Exposed at ISO 200 f10, 1/1000 second, metered manually.
About noon, New England Central dispatched a pair of GP38s south as ‘Extra 608’. Although once standard, today finding a pair of New England Central’s yellow and blue GP38s together is a rare treat. These ambled southward through Monson over Stateline Hill (so named because it crests near the Massachusetts-Connecticut border), which allowed ample opportunities for photographs. Extra 608 was destined for Willimantic to help clear the line and collect interchange left by the Providence & Worcester. All in all, this was a productive day for photography. I worked with my Lumix LX-3, Canon 7D, and Canon EOS-3. The Velvia 50 I exposed won’t be processed for a while; I’m on the big green bird tomorrow afternoon! Perhaps while traveling, I’ll write a detailed post on my experience exposing railway images in the snow.
New England Central extra 608 approaches Bridge Street in Monson, Massachusetts on February 10, 2013. Canon 7D with 100mm f2.0 lens.New England Central extra 608 at Stafford Springs, Connecticut on February 10, 2013. Lumix LX-3 photo.Trailing view of New England Central GP38s passing Stafford Springs, Connecticut. Canon 7D with 40mm pancake lens.
Artificial light illuminates the snow at New England Central’s Palmer, Massachusetts yard office on the evening of February 22, 2011. How much snow covers the yard tonight? And how much will be there by Saturday morning (February 9, 2013)? Exposed with Lumix LX-3 on a Bogen tripod. Set on aperture priority mode, f3.5 at ISO 80, with a plus 1 stop override to compensate for snow and artificial lights. If I’d allowed the camera to pick the exposure without compensation, an underexposed (dark) image would have resulted.
Tonight (February 8, 2013) a blizzard rages outside the window. The roads are closed, the railroad is quiet (so far as I know), and I’m not out, knee-deep in snow, trying to make night photos. (Ok, so I’m as mad as hatter, or worse—used to be lots of hatters here in Monson, back in the day.) However, I pulled up an image from my digital archive of Florida East Coast GP40-2 417 at New England Central’s Palmer Yard office on February 22, 2011. There’s something incongruous about a Florida East Coast locomotive in the snow. I’d met Bob Buck of Tucker’s Hobbies that evening for dinner, and later we’d stopped by Palmer yard to see what was about.
Since that night, nearly two years ago, New England Central has applied its own lettering to several former Florida East Coast locomotives; Bob has passed on; and New England Central has become part of the Genesee & Wyoming short line railway empire. Everything changes.
Braving frigid temperatures to take advantage of incredible low-light; on this day, three years ago (February 8, 2010), Pat Yough, Chris Guss & I were in Toronto photographing in suitably arctic conditions. Cold but clear—there’s a fantastic, surreal quality of light in sub-zero temperatures which can lead to great images if you chose to endure the conditions. Not, only were we up early, but the night before we spent an hour or more making night shots from the Bathurst Street Bridge. It didn’t get any warmer by daybreak, which we photographed from the lake front west of the city center. On that morning, after setting up the tripod, my numb hands only managed to record in my note book, “0646 [6:46 am]—ugg. Twilight—cold.”
View from Bathurst Street, Toronto approaching Midnight on February 7, 2010. Lumix LX-3 time exposure.Sunrise on Lake Ontario, February 8, 2010. Lumix LX-3 on tripod.
While we made an intense tour of Toronto area railroading, among the most memorable images were those exposed toward the end of daylight near Queensway & King Streets along the Canadian National quad-track line west of Union Station. This is one of the busiest lines in Canada, and hosts a flurry of trains at rush hour. For me the highlight was a pair of in-bound GO Transit trains with new MP40PHs running side-by-side as the sun hugged the horizon over lake Ontario. A few minutes later, I scored a VIA train gliding under a signal bridge in last glint of sunlight. At the time, I was still working primarily with film, and I kept both Canon EOS-3s busy. One was fitted with my 100-400 IS zoom, the other with a 24mm AF lens. The only digital camera I had was my Lumix LX-3, which I learned tends to chew through battery power in sub-zero conditions. By the end of the day, I’d drained three full batteries. The McDonalds on King Street made for a nice place to thaw hands on cups of hot chocolate while watching TTC’s trams glide by at dusk. On the way back we swung by Niagara Falls, my first visit to the famous waterfall, despite having photographed trains crossing the gorge on several occasions over the years.
Eastward GO Transit trains near Sunnyside at sunset on February 8, 2010. Canon EOS-3 with 100-400 zoom; Fujichrome RVP-100, exposure not recorded.Eastward GO Transit trains near Sunnyside at sunset on February 8, 2010. Canon EOS-3 with 24mm lens; Fujichrome RVP-100, exposure not recorded.Eastward VIA Rail train approaches Sunnyside at sunset on February 8, 2010. Canon EOS-3 with 100-400 zoom; Fujichrome RVP-100, exposure not recorded.View of TTC streetcar on King Street from McDonalds on corner of Roncesvalles Avenue and Queen at dusk on February 8, 2010. Lumix LX-3 ISO 80 at f2.8.TTC Streetcar at corner of King and Queen Streets, Sunnyside, Toronto, February 8, 2010. Lumix LX-3 set at ISO 80.Time exposure of Niagara Falls from the Ontario side. Exposed digitally with a Lumix LX-3 on a Bogan tripod.
Changing skies on Montana’s Marias Pass. On July 6, 1994, an eastward intermodal train approaches Grizzly on the former Great Northern mainline. I exposed this image less than a week after announcement of the Burlington Northern-Santa Fe merger. Nikon F3T with f1.8 105mm lens; exposed on Kodachrome 25.Montana Rail Link light helpers on the former Northern Pacific grade over Mullen Pass, west of Helena, Montana on July 9, 1994. Kodachrome 25 film exposed with a Nikon F3T with 35mm PC lens.
Look up, take in the heavens and transform a railway scene in to a cosmic image. That’s a theory anyway. During my 1994 visit to Montana, I was awed by the amazing skies for which the state is famous. Big sky and wide-open vistas can make for impressive railway images, yet getting the balance between right between atmosphere and railway is no easy chore. Here, I’m offering two of my most successful attempts. Both were exposed on Kodachrome 25 using my Nikon F3T. The peculiarities of Kodachrome’s spectral sensitivity made it a great medium for working with textural skies and dramatic lighting. Not only did Kodachrome 25 benefit from exceptional dynamic range, but also the way it translated blue light I found conducive to dramatic images featuring impressive skies.
While these slides look great when projected on a screen, and both were successfully reproduced in my 2005 book Burlington Northern Santa Fe Railway, I found they required a bit of adjustment using Adobe Photoshop to make them look good on the computer screen.
Different tools yield different results and I wonder how I might I use my Canon 7D or Lumix LX-3 in similar lighting situations.
In June 1993, I traveled with fellow photographer Brian Jennison to eastern Oregon to make images of Union Pacific’s Challenger (locomotive 3985) which was working its way east over the Blue Mountain grades. After a couple of days with the steam locomotive, we wandered into central Idaho, exploring locations along the Union Pacific mainline. This image was made looking east toward the Snake River at UP’s timetable location called Reverse (Idaho Division, Third Subdivision at milepost 393 between Glenns Ferry and Mountain Home). Have you noticed there’s been a theme over the last few days?
Nikon F3T with 28mm AF lens exposed on Kodachrome 25 at f8 1/125 second.
Watch out for rattlesnakes! It seems like a clichéd railfan warning. Although, I’ve encountered rattlers on several occasions, I’d not allowed fear of snakes (or heights) interfere with my photography. In July 1994, I was on a prolonged trip working my way east from San Francisco to Waukesha, Wisconsin. Part of this excursion, was a ten-day exploration of Montana. Working on a tip from Blair Kooistra regarding a interesting photo location, I’d driven down the long rocky road to the old station at Lombard, deep within the canyon of the same name. Back in the day, it was here that Milwaukee Road’s Pacific Extension crossed Northern Pacific’s mainline. In 1994, as today, only vestiges survive of Milwaukee Road, while Montana Rail Link’s former NP line is the main attraction (if one hopes to see trains moving; the industrial archeologist is likely more interested in the old Milwaukee electrified line). The point of interest, which I’m told featured some GRS upper quadrant semaphores, required a several mile walk west into the canyon.
A large snake (of the non-rattling variety) suns itself on Montana Rail Link in Lombard Canyon, Montana. Nikon F3T with 105mm lens; Kodachrom 25 exposed at f4.5 1/250th second
I’d made it about a mile or two from the car when I had an unsettling feeling of being watched. Looking around I realized that several impressively large snakes were sunning themselves on the tracks and eyeing my progress. I determined, that while large, these snakes didn’t have rattles on them, and so probably wouldn’t harm me. I made a few photos of this one coiled in the gauge. Then I continued my westward hike when the bone chilling rattle of the dreaded serpent stopped me dead in the tracks. I looked cautiously to my left, and there coiled in a heap, between the tracks and the river, was by far the largest rattlesnake I’d ever seen. It didn’t look nice. Worse, it seemed poised as about to spring and gazing at me with its tongue listing back and forth. Thus ended my westward progress. There I was, a two mile walk from my car in an unpopulated barren canyon, with probably 20-30 mile drive to anyplace with a phone, and me not having a soul on the planet knowing where I stood! Not good.
Without making sudden moves, I reversed direction and carefully retreated on foot back toward the old Lombard station location where my car sat waiting for me. Thankfully, that was the last time I’ve encountered such a beast trackside. Unfortunately, the semaphore I’d hoped to photograph is now long gone. Where’s the photo of the momma rattler? I didn’t make one, primarily because it was lying in deep shadow and I was in bright sun. (Which is as good an excuse as any).
Railway tracks; classic converging lines aimed toward distant horizons, a symbol of progress and travel, and often the primary subject of for my camera’s lens. Here I’ve presented just two images of railway tracks. One is of the throat to DB‘s Frankfurt Hauptbahnhof (Frankfurt am Main, Germany) the other is yard trackage on Pennsylvania’s narrow gauge East Broad Top Railroad at Orbisonia. The German photograph portrays well-maintained, heavily used infrastructure with ladders of double slip switches designed to maximize route flexibility. This was made on a sunny summer evening and exposed to retain detail in ballast and avoiding a harsh silhouette (although that can be an effective imaging technique). By contrast, the East Broad Top image shows a preserved three-way stub switch, representing a vestige of lightly built 19th century-style infrastructure, and exposed in the soft light of a foggy autumn morning. In both images railway tracks lead the viewer’s eye out of the frame to unseen horizons. To allow for a level of intrigue. I’ve deliberately masked where the tracks lead.
Frankfurt Hauptbahnhof, June 13, 2001.East Broad Top Rock Hill Furnace Oct 12 1997.
Both images were exposed on Fujichrome slide film with my Nikon N90S.