They are easy to use. It’s like stepping back in time. Sort of.
Panasonic’s new camera comes with a fantastic lens and sensor combination, but what if clarity seems too sterile? Perhaps, you want to get the effects (and defects) characteristic of old film cameras? No problem!
The LX100 has a button on top of the camera called ‘filters,’ which alters the color, contrast, exposure and sometimes the focus of digital files to emulate a variety of effects that were once characteristic of older camera-film combinations.
The advantage of the ‘filters’ feature is that the effects are done ‘in-camera’ without the need to fiddle around with photo-shop or other post-processing software. The button opens a menu and you simply select the desired filter. This shows you the treatment on screen and in the viewfinder.
In my early days of photography, I experimented with a variety of older cameras, and sampled various film types. My skills weren’t yet developed and my results were a bit random. The LX100’s filter mode allows me to step back to those early experimental times when any photographic result seemed like success.
The best part of filters is that you can easily switch from one mode to the next and back to normal again quickly. Below are some of the filter results. I’ve given these comparative names in ‘quotes’ that I felt were more appropriate than Panasonic’s, but put the camera-filter name in [brackets] for reference. Just so you know. Ok?
Do you have any favorites?
‘Cheap 400 speed print film with drug store processing’ [High Key].‘Whoops, I sent my print film in with a slide mailer’ [Cross processing]‘Underexposed Ektachrome 200’ [Expressive].‘Fogged color print film’ [Impressive Art].‘Underexposed Kodacolor 100’ [Low Key].Black & white that I processed with exhausted fixer. [Sepia].Black & white printed with exhausted Dektol developer. [Monochrome].Overexposed, overprocessed Tri-X that I processed in the sink. [Rough Monochrome].Instamatic attempt with color print film. [Toy Effect]‘Light leak.’ “Oh no! I think I opened the back of the camera”. [Sunshine].‘This is my friend’s cheap HO layout’ (What a fool, he’s tried to model Palmer!). [Miniature Effect].‘Bargain film, only 6 months past the expiration date!’ [Old days].‘Kodak sent me a note with my slides, it said they had a “unique laboratory occurrence” and a free roll of 24 exposure K64.’ [Bleach Bypass].‘Drugstore processed black & white’ [Silky monochrome].‘I think there’s something wrong with my light meter. This was some Ilford HP5 that I processed and the negatives were a bit ‘thin’. [Dynamic Monochrome].Funny, there didn’t seem to be a filter for ‘Kodachrome 25’.
I exposed this image of Pan Am Railways GP40 310 leading MOED on the afternoon of February 17, 2014. By any measure this scene posed a difficult exposure.
Canon 7D in-camera Jpg of Pan Am Railways 310 east of Shelburne Falls, Massachusetts. To my eye, this image appears too bright. Had it been a color slide I’d say it was about a half stop ‘over exposed.’ This Jpg was created using the Canon’s picture style profile called ‘landscape’ (one of several built in Jpg picture styles).
The locomotive is a dark blue, while the scene posed a full range of tones from bright white snow to deep shadows. The train was moving, and there was little time for exposure bracketing.
Using the camera’s histogram, I’d made a test exposure before the train came into the scene, and then made a series of images focused on the composition.
Working with my Canon EOS 7D, I always expose simultaneous Jps and Camera RAW files. Most of the time the in Camera hi-res Jpg proves acceptable, and simply archive the RAW files for the future.
However, in this instance when I got home, I found that the in-camera Jpg appears to bright to my eye. I re-checked the camera’s histogram for that file and confirmed that the image was exposed correctly.
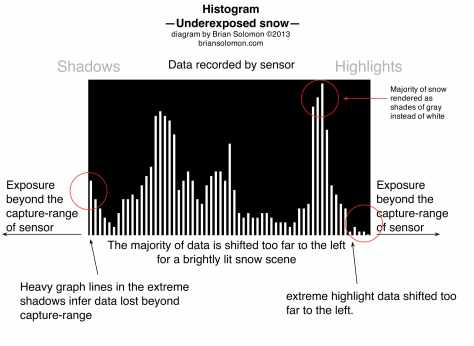
This is the information displayed at the back of the camera. The histogram is just about ideal. The bulk of the exposure is at the center of the graph and there is virtually no clipping of shadow or highlight areas. (See my earlier post on snow exposure for graph interpretation.)
In previous posts I’ve explained that with modern digital imaging old-school film-based assessments of ‘under’ (too dark) and ‘over’ (too light) exposure do not allow for the most accurate way of selecting exposure. (see: Snow Exposure—Part 1)
Instead of using the image at the back of the camera, or even the photo on my home computer screen, to judge exposure, I use the histogram. This graph allows me to select an exposure that maximizes the amount of information captured by the camera on-site.
In this case, although the Camera processed Jpeg seemed too bright (over exposed), the camera RAW file was perfect. Since the problem was in the camera’s translation of the RAW to Jpeg, the solution was simple:
I converted the RAW to a Jpeg manually, which produced a result that matched the scene. This retained excellent highlight detail in the snow, produced a pleasing exposure for the side of the locomotive and hills beyond, while retaining good shadow detail in the tree at the left.
Here’s the camera RAW file. This has not been interpreted by in-camera processing to conform to a pre-established ‘picture style’. The result is perfectly exposed. I simply converted the file to a Jpg manually and scaled it for display here. I did not adjust exposure, contrast, or color. In other words it was an easy fix: there was never really a problem with the file, only with my perception of how the ‘landscape’ style Jpg had interpreted the image.
I did not manipulate or adjust the file except to scale the image and convert it to a Jpg for presentation. (the RAW file is far too large to up-load effectively).
The word was out that Norfolk Southern’s Pennsylvania Railroad painted heritage locomotive was to work a detoured stack train over CSX’s Trenton Subdivision to avoid a scheduled engineering project at Norristown, Pennsylvania.
Pat Yough and I planted ourselves at the West Trenton, New Jersey SEPTA station in anticipation. A number of other enthusiasts had similar plans, so there was plenty of company.
Former Reading Company station at West Trenton, New Jersey on the morning of January 19, 2014. Lumix LX3 photo.Detailed view of West Trenton station. Exposed with a Canon EOS 7D with 100mm lens.West Trenton station’s build date is carved in stone. Lumix LX3 photo.A SEPTA train for Philadelphia’s Airport pulls into the West Trenton station. CSXT’s unit oil train K040 with BNSF locomotives waits in the distance. Canon EOS 7D with 100mm lens.After the SEPTA local departed, CSXT KO40 led by BNSF 9688 and 5523 rolls southward through West Trenton. This section of the old Reading demonstrates how freight and passenger traffic can coexist on the same line. Canon EOS 7D with 100mm lens.CSXT symbol freight Q439 works south behind mixed consist of GE and EMD locomotives. Canon EOS 7D with 100mm lens.Switchers have become relatively rare items on modern railroads so I made this grab shot of CSXT 1137 as it rolled by. Lumix LX3 photo.A SEPTA Silverliner V waits to enter West Trenton Station. Canon EOS 7D with 200mm lens.
The much anticipated Norfolk Southern detour I5T, (running as CSXT B100-19) works northward through West Trenton. At the back of the train are a pair of NS diesels to aid with reverse moves necessary for the detour arrangements. Canon EOS 7D with 100mm lens.
The former Reading station building at West Trenton is now privately owned (and serves a non-railroad function), while the platforms remain active for SEPTA’s regularly scheduled passenger trains to Philadelphia.
When we arrived, morning clouds were giving way to sun. A pair of westward CSX trains was holding just west of the electrified zone and the radio was alive with activity.
In a little more than an hour we caught three SEPTA trains and four freights. This kept me and my three cameras pretty busy. My goal was not just to photograph the trains, but to capture these trains in this classic railroad environment.
Norfolk Southern 8102 was in clean tuscan-red paint at it trailed at the back of nearly two-miles of double stacked containers. Canon EOS 7D with 100 mm lens.Trailing with of NS I5T (CSXT B100-19) passing the West Trenton tower. Canon EOS 7D.CSXT empty oil train K041 works northward behind the detoured stack train. BNSF locomotives make a bit of color in this otherwise drab New Jersey scene. Canon EOS 7D with 20mm lens.
SEPTA local arrives at Overbrook on the way to Thorndale. Canon EOS 7D photo.
This morning dawned with a blood-red sunrise. Something about a red sky in the morning?
What I’d call ‘winter’ has been given all sorts of new fancy names. Probably the most absurd is the ‘polar vortex.’ Next up is the term handed to today’s precipitation: ‘bombogensis.’
Call it what you like. By about 2:30 pm today 6 inches of snow was improving photography all over Philadelphia, and by 5 pm there was 8-10 inches was making for interesting images.
My brother Sean and I spent the afternoon in Philadelphia making photos of SEPTA and snow accumulation while running errands. Falling and drifting snow made for some dramatic photography opportunities.
Inbound SEPTA multiple unit approaches Overbrook Station. Canon EOS 7D photo.Late-running Amtrak Keystone service crosses over at Overbrook. Canon EOS 7D photo.SEPTA number 10 trolley takes the corner at Lansdowne Avenue. Canon EOS 7D photo.SEPTA number 10 glides along in the snow on the afternoon of January 21, 2014. Canon EOS 7D photo.A vintage PCC in Route 15 service ambles along snow-covered Girard Avenue. Canon EOS 7D photo.Trailing view of a SEPTA PCC on Girard Avenue, on January 21, 2014. Canon EOS 7D photo.
Snow exposure I always tricky. My basic rule of thumb is to use the camera meter to set a gauging point, then open up (over expose) by 2/3s to a full stop above the camera meter. Using the histogram on the back of the camera, I then fine tune my exposure depending on the setting.
Cleaning the sidewalks on Viola Street at dusk. Canon EOS 7D photo.Former Pennsylvania Railroad position light signal shows a ‘stop’ aspect. January 21, 2014. Canon EOS 7D photo.
An inbound SEPTA MU arrives at Overbrook on the evening of January 21, 2014. Despite the snow, this service was on schedule. Canon EOS 7D photo.Former Pennsylvania Railroad Main Line looking east at dusk. Canon EOS 7D photo.
I’ve posted this image as another example of my work with a perspective control lens. This was a tool I made excellent use of in the early 1990s. On the recommendation of J.D. Schmid, I bought a Nikon 35mm PC ‘Shift’ lens for my Nikon F3T.
Among the advantages of a perspective control lens is the ability to shift the front element. This can be used to keep vertical lines from converging, but also to alter the image in subtle ways.
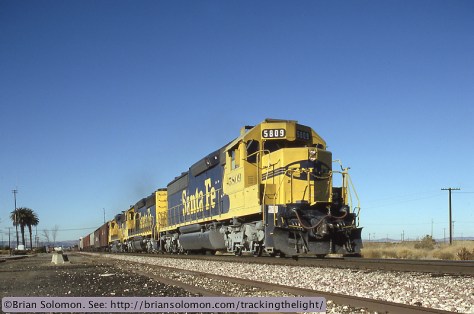
Santa Fe SD45-2 5809 thunders east with a freight at West Pittsburg, California in November 1990. Exposed on Kodachrome 25 film with a Nikon F3T with 35mm PC lens at f4 1/500th of a second.
It was a clear Saturday morning in the Bay Area, and Brian Jennison and I were on one of our jaunts looking at area railroads. We stopped near the old station location at West Pittsburg (no ‘h’), California. (I believe the palm trees in the distance are an indication of where the building once stood.) Here we photographed several trains.
For this eastward freight, I positioned the camera relatively low to the ground and raised the front element of the 35mm PC to near its maximum. I didn’t quite keep the camera level. The result includes a large amount of crystal blue sky, while minimizing the foreground and keeping the vertical elements of the lead locomotive nearly parallel with the image frame.
I feel the subtle effect allows the locomotive visually surge forward, seeming to charge along. This was my intent. Santa Fe 5809 is an SD45-2, a machine powered by EMD’s 3,600 hp 20-cylinder diesel.
In their heyday these were powerful machines that produced an awe inspiring low-base sound in the high-throttle positions. I hoped to convey that power visually while making use of the California sky.
Tracking the Light posts new material daily. Please spread the word and share Tracking the Light with anyone who may enjoy seeing it!
Autumn is my favorite time to make photographs. Crisp days, rich low sunlight, and bright rusty foliage make for a great combination of conditions.
In Late October 2004, Tim Doherty and I spent several days exposing photographs around Montreal. On the morning of October 24, we worked this location south of downtown which featured a shining skyline view.
I exposed this image with my Nikon N90s and 80-200 zoom lens on Fujichrome film.
In 1989, New York, Susquehanna & Western served as the court appointed operator of Delaware & Hudson. By virtue of the 1976 Conrail merger, D&H had been granted trackage rights on the former Erie Railroad route from Binghamton to Buffalo, New York. On this March morning, a new NYS&W General Electric led an eastward double stack train on the old Erie near West Middlebury, New York, 384 miles from Jersey City.Exposed on 120 Kodachrome transparency film with a Hasselblad 500C with 80mm Zeiss Planar lens
In March 1989, I was halfway through my final term at the Rochester Institute of Technology. My course load was light enough to allow me several days off a week to pursue my own work.
On this day, my flat mate Bob lent me his Hasselblad, which I loaded with 120 Kodachrome 64. Wow, was this ever a winning combination! It offered brilliant color with exceptional sharpness on a large transparency.
While I took advantage of Bob’s Hasselblad and 120 Kodachrome on several occasions, the relatively high cost of this format precluded my frequent use of it. At the time I was living on about $30 a week and a single roll of 120 Kodachrome processed was beyond my budget. (Also, Bob occasionally needed his camera).
Once I completed my degree, the high cost of Hasselblad cameras put them well out of reach for years. Other considerations were related to practicality. I found the Hasselblad awkward to use for my style of photography, and I had very limited applications for 120 transparencies.
Realistically, the 35mm slide format was not only better suited for most of my color needs, but also far more affordable.
Yet images like this one continue to nag me. From time to time, I have continued to experiment with 120-color transparency film, often with very good results. I’ve never been satisfied with my reluctance to make the plunge. Tough choice.
A week after I exposed this photo, I made an 11x14in Cibachrome print of it. (Thanks to my dad who fronted me the cash for 50 sheets of Ciba paper). Incidentally, the scan of the original image fills nearly 280 MB on my hard drive. If I’d scanned it at the maximum capabilities of my Epson, it would probably reach a GB. That’s a lot of information in one photograph. The image could fill a wall.
LUAS tram advertising McDonalds pauses at Dublin’s Heuston Station on the evening of 20 July 2013. Lumix LX3 photo.
I was waiting to catch Dublin’s LUAS from Heuston Station to the city centre last Saturday evening (20 July 2013) when I spotted this advertising tram outbound.
I grabbed my Lumix, set it for ‘Aperture Priority’ (the ‘A’ on the top dial) and dialed in a 1/3-exposure override to compensate for the inadequate contrast ratio caused by sodium vapor streetlights against a dark sky.
As explained in earlier posts (click here), many camera meters expect daylight-type situations, and thus calculate exposure based on these parameters and this tends to result in under exposure of nighttime scenes. Since the camera meter doesn’t know what the scene looks like, it is important to make the adjustment manually.
I’ve found from past experience that a 1/3 to 2/3s stop override (in other words + 1/3 or 2/3s in the exposure menu) general provides the necessary compensation. Another alternative is to make a test photo and then expose manually based on the histogram output. This required more time than I had, so I went for the easy solution.
I faced another problem. No tripod. So, I relied on my fall back alternative of placing the camera on the ground while propping up the lens with my spare Lumix battery. This has the secondary effect of providing an unusually dramatic angle.
One last complication: I had only one exposure left on the camera’s card! I knew this and so had to get it right with one try. The tram only stopped long enough for me to make that one exposure anyway.
It was nearly a full moon, which gave me a little bit extra skylight. If I’d had more time and more exposures, I may have made a second photo with a 2/3s exposure override. But that’s a minor point. Hopefully, I have another opportunity to photograph this unusual tram. Perhaps next time in daylight
About 10 months ago (July 2012), I started Tracking the Light. In the short time span since then I’ve had about 19,000 hits. While small numbers compared with Gangnam Style’s viral You-Tube dance video (with more than 1.7 billion hits), it’s a gratifying start. (BTW, there are some train scenes in Gangnam Style, so it isn’t a completely random reference).
In my introductory post, I offered a bit of my background with a taste of my philosophy on the subject of railway photography; ‘There is no ‘correct way’ to make photographs, although there are techniques that, once mastered, tend to yield pleasing results. I hope to expand upon those themes in these Internet essays by telling the stories behind the pictures, as well as sharing the pictures themselves.’
Irish Rail Intercity Rail Cars converge on Islandbridge Junction, May 2013. Lumix LX3 photo. I routinely post images of Irish railways. Check regularly for updates. Also, I have a special page on Dublin that is more than railway images. For more Irish Rail click here!An empty timber from Waterford near Donamon, County Roscommon, Ireland. Canon 7D with 100mm f2.0 lens.
What began as an infrequent opportunity to share work via the Internet has evolved into a nearly daily exercise. In the interval, I’ve learned a bit what makes for an interesting post, while working with a variety of themes to keep the topic interesting.
TTC Streetcar at corner of King and Queen Streets, Sunnyside, Toronto, February 8, 2010. Lumix LX-3 set at ISO 80. Originally Posted February 8, 2013
Regular viewers may have observed common threads and topics. While I’ve made a concerted effort to vary the subject matter considered ‘railway photography,’ I regularly return to my favorite subjects and often I’ll post sequences with a common theme.
Occasionally I get questions. Someone innocently asked was I worried about running out of material! Unlikely, if not completely improbable; Not only do I have an archive of more than 270,000 images plus tens of thousands of my father’s photos, but I try to make new photos everyday. My conservative rate of posting is rapidly outpaced by my prolific camera efforts.
New England Central GP38 3850 leads train 608 at Stafford Springs on January 25, 2013. A series of difficult crossings in Stafford Springs is the primary reason for a 10 mph slow order through town. Especially difficult is this crossing, where the view of the tracks is blocked by a brick-building. Protection is offered by a combination of grade crossing flashers and traffic lights. Canon 7D with 40mm Pancake Lens; ISO 400 1/500th second at f8.0. In camera JPG modified with slight cropping to correct level and scaling for web. A RAW image was exposed simultaneously with the Jpg. Originally posted on January 26, 2013.
Someone else wondered if all my photos were ‘good’. I can’t answer that properly. I don’t judge photography as ‘good’ or ‘bad’. Certainly, some of my images have earned degrees of success, while others have failed to live up to my expectations (It helps to take the lens cap ‘off’). Tracking the Light is less about my success rate and more about my process of making images.
A couple pair of laden Bord na Mona trains struggle upgrade, laying sand down as they ascend a short steep grade on the run back toward Mountdillon. This is the same stretch of track pictured in Irish Bog Railways–Part 2. Originally posted on March 4, 2013
I’m always trying new techniques, exploring new angles, while playing with different (if not new) equipment.
The most common questions regarding my photography are; ‘What kind of camera do you use?’ and ‘Have you switched to digital?’ I can supply neither the expected nor straight-forward responses. But, in short, I work with a variety of equipment and recording media. I aim to capture what I see and preserve it for the future. I try to have a nice time and I hope to entertain my friends.
Learn my secrets, click here. This image was made in Spring 2012 on Fuji Acros 100 film exposed with a Leica 3a and 21mm lens and specially processed for scanning.Semaphores are one of my themes. See my post from September 23, 2012. Eastward Delaware & Hudson symbol freight ‘Jet1’ passes semaphores at milepost 320 (measured from Jersey City) east of Adrian, New York on May 14, 1988.
Originally posted on December 1, 2013. CSX Q427 rolls through Palmer, Massachusetts, at 11:01 pm on November 30, 2012. Notice the photographer’s shadow superimposed on the blur of the train. Single exposure with Panasonic Lumix LX-3 with Leitz Summicron lens, zoom set to 5.1mm, ISO 200, exposed in ‘A’ mode with +2/3 over-ride, f2.2 at 7 seconds. Entirely exposed with existing light; no flash.
CSX General Electric Evolution-series diesels work west at Palmer, Massachusetts on May 17, 2013. Exposed digitally with my Canon EOS 7D.
CSX Q264 at West Warren, Massachusetts.
Martinez, California, as viewed from Carquinez Scenic Drive. Canon EOS 3 with 100-400 mm lens, Fujichrome slide film.The number plate on a smoke box door catches the hint of a blue sky beyond. Canon EOS7D with 28-135mm lens.
When I was visiting Brussels last weekend, I made a series of nocturnal images of the city and its transport. Below are a few of my favorites.
Brussels Central Station is largely below street level. Access to the platforms is via this modern ground level building. I exposed this image on the evening of March 22, 2013 using my Lumix LX3 set at ISO 80 in ‘A’ (aperture) mode with a +2/3 exposure over-ride (to compensate for the night sky and highlights from streetlights). The final exposure was f2.8 at 1 1/3 seconds.Sometimes it’s best to take an opportunistic approach to urban photography. I made this grab-shot with my Canon EOS 7D (fitted 28-135mm lens set at 5000 ISO) from the front seat of a Citroen Picasso paused at a set of traffic lights. Panning the tram using slow shutter speed minimizes the visual defects caused by shooting through a car window. The combination of twilight, streetlights, and motion make for a surrealistic image.A Brussels PCC tram glides along at dusk on March 24, 2013. Exposed with a Canon EOS 7D fitted with 28-135mm, set at ISO 5000 f3.5 1/30 second.
For years, friends have asked my advice on camera exposure, typically on-site with a train bearing down on us. Politely, I’ll offer suggestions—based on conditions, but such advice can be deceiving since conditions change quickly. For my photography, I often refine exposure as the scene unfolds. A train entering a scene may alter my anticipated exposure, which requires subtle adjustments at the last moment.
Using the camera’s histogram to judge exposure is part of my latest technique for refining exposure and making optimum use of the digital camera sensor. A histogram reflects exposure information collected by the sensor. This is displayed as a graph that offers exposure quantification: it shows the range of data recorded by the sensor and alludes to data lost. The histogram allows me to gauge when the scene is over- or under-exposed. It solves much of the guesswork previously necessary when shooting film, while providing real information by which to adjust future exposures. What it doesn’t tell me, is as important to what is displayed on the graph.
Using film, ‘over-exposure’ inferred that too much light reached the emulsion and resulted in an image that appears too bright, while ‘under exposure’ inferred that too little light, thus and a dark image. It was never as simple as that, but that’s good enough for the moment.
The advent of digital imaging combined with the ease of post-processing using digital technology has changed the definitions of exposure, so far as I’m concerned. I can now use information from camera sensor on-site to help capture the greatest amount of information.
This is not much different than my traditional approach to black & white photography. The new tools offered by modern digital cameras have altered my means for calculating exposure. More to the point; the need for obtaining desired visual balance between light and dark in-camera isn’t part of my exposure technique because the appearance of the exposed image in the thumbnail on the camera display doesn’t accurately reflect data collected, while the final image may be best refined after exposure.
Here’s a difference between film and digital: Film sensitivity is less definitive than with digital sensors; simply, the data accumulated during a digital exposure fits between definite parameters, while with film significantly more information may be retained than is readily visible to the naked eye. Beyond these limits with digital, data isn’t recorded (to the best of my understanding). Thus to obtain the greatest amount of visual information a digital exposure must be calculated to be carefully placed between the image’s deepest shadows and brightest highlights. The tool needed to gauge this decision is the camera’s histogram.
A histogram displays a series of lines progressing from dark to light. These lines reflect the number of pixels exposed in the various gradations. How this data is collected isn’t important for this exercise. Crucial, is the assessment of the histogram in order to make future exposures that don’t lose critical information in extreme highlight or shadow areas.
When I make snow photos, I expose in a manner to place the bulk of information toward the center of the graph. I pay close attention to highlight falloff. Losing detail in the brightest parts of distant clouds, or at the center of locomotive headlights isn’t a problem, but losing detail in snowy foreground is undesirable. Ideally, the graph will taper gently into the extremes, indicating the smallest degree of loss in the deepest shadows and brightest highlights.
The histogram is extremely useful when exposing bright snow scenes, because most camera automatic settings are not tuned to expose for large fields of white and tend to grossly misjudge a brightly lit and largely white scene. This typically results in under exposure which renders snow gray rather than white and, risks opaque shadows (a substantial loss of information). It renders many elements too dark (such as the train passing through the scene). However, a few modern digital cameras have ‘snow settings’ that should overcome these difficulties.
Before making my desired image sequence, I’ll make a series of test exposures to check the effect of camera settings. Based on information displayed by these graphs I’ll make exposure adjustments to place highlights and shadows appropriately. As my subject approaches, I’ll further refine my exposure by making adjustments in 1/3-stop increments. I’ll continue to compensate for exposure changes caused by the train entering the scene (including variations caused by locomotive headlights and ditch lights).
Displayed here are both hypothetical graphs to show how I read histograms, and images of the real graphs from my Canon 7D exposed in snowy scenes last Sunday, February 10, 2013. Both types of images are intended to illustrate how I’ve selected exposures.
I use the histogram feature all the time, but find it most useful in extreme situations. It has proved its value by eliminating uncertainties previously caused by the extremes of snow photography.
Some advice for the graph-adverse photographer working in snow: use the camera meter to gauge base exposure then override the meter by opening up by 2/3 of a stop (for example open from f11 to f9).
CSX light engines roll through CP83 at Palmer, Massachusetts on February 10, 2013.

!['Cheap 400 speed print film' [High Key].](https://i0.wp.com/briansolomon.com/trackingthelight/wp-content/uploads/2014/11/Amtrak_39_HIGH_KEY_P1090498.jpg?resize=474%2C317)
!['Whoops, I sent my print film in with a slide mailer' [Cross processing]](https://i0.wp.com/briansolomon.com/trackingthelight/wp-content/uploads/2014/11/Amtrak_39_CROSS_PROCESS_P1090507.jpg?resize=474%2C317)
!['Underexposed Ektachrome 200' [Expressive].](https://i0.wp.com/briansolomon.com/trackingthelight/wp-content/uploads/2014/11/Amtrak_39_EXPRESSIVE_P1090496.jpg?resize=474%2C317)
!['Fogged color print film' [Impressive Art].](https://i0.wp.com/briansolomon.com/trackingthelight/wp-content/uploads/2014/11/Amtrak_39_IMPRESSIVE_ART_P1090505.jpg?resize=474%2C317)
!['Underexposed Kodacolor 400' [Low Key].](https://i0.wp.com/briansolomon.com/trackingthelight/wp-content/uploads/2014/11/Amtrak_39_LOW_KEY_P1090499.jpg?resize=474%2C317)
![Black & white that I processed with exhausted fixer. [Sepia].](https://i0.wp.com/briansolomon.com/trackingthelight/wp-content/uploads/2014/11/Amtrak_39_SEPIA_P1090500.jpg?resize=474%2C317)
![Black & white printed with exhausted Dektol developer. [Monochrome].](https://i0.wp.com/briansolomon.com/trackingthelight/wp-content/uploads/2014/11/Amtrak_39_MONOCHROME_P1090501.jpg?resize=474%2C317)
![Overexposed, overprocessed Tri-X that I processed in the sink. [Rough Monochrome].](https://i0.wp.com/briansolomon.com/trackingthelight/wp-content/uploads/2014/11/Amtrak_39_ROUGH_MONOCHROME_P1090503.jpg?resize=474%2C317)
![Instamatic attempt with color print film. [Toy Effect]](https://i0.wp.com/briansolomon.com/trackingthelight/wp-content/uploads/2014/11/Amtrak_39_TOY_EFFECT_P1090508.jpg?resize=474%2C317)
!['Light leak.' "Oh no! I think I opened the back of the camera". [Sunshine].](https://i0.wp.com/briansolomon.com/trackingthelight/wp-content/uploads/2014/11/Amtrak_39_SUNSHINE_P1090511.jpg?resize=474%2C317)
!['This is my friend's cheap HO layout' (What a fool, he's tried to model Palmer!). [Miniature Effect].](https://i0.wp.com/briansolomon.com/trackingthelight/wp-content/uploads/2014/11/Vermonter_CabCar_CP83_MINIATURE_EFFECT_P1090537.jpg?resize=474%2C317)
!['Bargain film, only 6 months past the expiration date!' [Old days].](https://i0.wp.com/briansolomon.com/trackingthelight/wp-content/uploads/2014/11/Vermonter_CabCar_CP83_vert_OLDDAYS_P1090521.jpg?resize=474%2C709)
!['Kodak sent me a note with my slides, it said they had a "unique laboratory occurrence" and I got a free roll of 24 exposure K64.' [Bleach Bypass].](https://i0.wp.com/briansolomon.com/trackingthelight/wp-content/uploads/2014/11/Vermonter_CabCar_CP83_BLEACH_BYPASS_P1090536.jpg?resize=474%2C317)
!['Drugstore processed black & white' [Silky monochrome].](https://i0.wp.com/briansolomon.com/trackingthelight/wp-content/uploads/2014/11/Vermonter_CabCar_CP83_SILKY_MONOCHROME_P1090530.jpg?resize=474%2C317)
!['I think there's something wrong with my light meter. This was some Ilford HP5 the I processed last week and the negatives were a bit 'thin'. [Dynamic Monochrome].](https://i0.wp.com/briansolomon.com/trackingthelight/wp-content/uploads/2014/11/Vermonter_CabCar_CP83_DYNAMIC_MONOCHROME_P1090528.jpg?resize=474%2C317)