On 20 April 2016, I made this image of a Swiss BLS Cargo (Bern Lötschberg Simplon) electric leading a northward freight on DB’s (German Railways) heavily traveled double-track line north of Freiburg, Germany.
Although clear and sunny, the direction of the light was directly behind the locomotive, which is anything but ideal.
To make the most of this awkward lighting situation, I opted to feature the flowering tree that was well-lit by the angle of the sun, and work with the locomotive in silhouette, while taking a low angle to minimize distracting elements on the far side of the line.
In post processing, I’ve lightened the shadow areas of the RAW file to restore detail and improve the overall contrast to the locomotive.
Below are both the unimproved RAW file (only scaled for presentation) and my modified file.
This is a Jpg made from FujiFilm X-T1 camera RAW file (scaled for internet presentation). No contrast adjustments.Using Lightroom, I’ve lightened the shadow areas and made an overall contrast adjustment with the ‘clarity’ slider. My aim was to produce a more graphic and interesting illustration of the BLS electric and flowering tree. Exposed on 20 April 2016.
The boards at Andermatt indicated that an unscheduled train was due to arrive.
Our curiosity was piqued.
This turned out to be a charter using a Glacier Express train set.
I’ve augmented the views of the train descending to Andermatt with a few images of another Glacier Express set parked in Matterhorn Gotthard Bahn’s sidings at Andermatt.
In mid-April, my friends and I visited Andermatt and were fortunate to catch this charter of Glacier Express equipment descending the rack railway grade toward Andermatt.Express is a relative term. The train isn’t very fast; but the views available from its windows are stunning.Looking toward Andermatt, Switzerland in April 2016.I made this view of Glacier Express equipment resting static on sidings in Andermatt. Can equipment stored out of service be called a ‘train?’
Below are two versions of an image I made of a Matterhorn Gotthard Bahn narrow-gauge train engaging the Abt rack system on its steep ascent from Göschenen to Andermatt.
These were made with my FujiFilm X-T1 digital camera on my visit to the Alps with Stephen Hirsch, Gerry Conmy and Denis McCabe in mid April 2016.
The first is the unadjusted (except for scaling) Jpg produced in camera. Notice that the sky is washed out and lacking in detail.
Camera produced Jpg exposed at Göschenen, Switzerland where the MGB meets the standard gauge line over the Gotthard Pass.
The second image is a Jpg that I produced from the camera RAW file by making nominal contrast and saturation adjustments in Lightroom.
Improved image; this was made from the RAW file by adjusting contrast and saturation .
The aim of the second image was to hold the sky and highlight detail that was lost by the camera Jpg. This demonstrates the ability of the RAW file to retain greater detail than the Jpg.
Instead of using an external graduated neutral density filter, as I had with some previous images displayed on Tracking the Light, I used the equivalent graduated neutral density filter in the Lightroom program.
Why not use the external filter in this situation? Two reasons:
The external filter is cumbersome and takes time to set up.
I wanted to improve the appearance of the sky without darkening the mountains. Using the electronic filter gives me the ability to selectively control highlights and shadows in the graduated area selected by the filter, while the external graduated filter would have covered the top of the image and darkened the mountains as well as the sky.
Both are valuable tools for improving a photograph.
Using my FujiFilm X-T1, I exposed this image last week looking across a field of dandelions near Erstfeld, Switzerland.
By using the tilting live-view display screen, I was able to hold the camera very low to the ground which allows for this exaggerated perspective of the foreground greenery and flowers.
The technique for both photos is essentially the same, however with the photo below of the Swiss ICN passenger train I used a slight telephoto and opted to crop the sky, rather than use a graduated neutral density filter to balance the contrast/retain detail.
An SBB ICN train glides along near Erstfeld in April 2016.
Below is another view from the same location near Erstfeld. Same camera, same lens, but I’ve set the zoom to a wide-angle view and I’m not as low to the ground.
The result is that the flowers remain in relative focus to the train and distant scenery. (Also I’m using the graduated neutral density filter to retain highlight detail at the top of the image).
A northward SBB freight approaches Erstfeld on the Gotthard route.
The train is a bit small, but this photograph is more about the whole scene rather than being focused on the train.
On October 14, 1995, Dick Gruber and I were visiting the Mid-Continent museum at North Freedom, Wisconsin when I exposed this unusual view of engine 1385.
Instead of focusing on the engine, I set my focus point on the window. Using my Nikon F3T, I exposed this image with an f1.8 105mm lens wide open for minimum depth of field. This is a personal favorite of mine and over the years I’ve reproduced it in various places.
Tracking the Light is on auto pilot while Brian is Traveling!
Does the mist and rain add a sense of mystique to one of the great railway wonders of the world?
At Biaschina, SBB’s route on the south slope of the Gottard Pass navigates a complete double spiral (or double helix).
The line passes through several tunnels and appears the viewer on three distinct levels, each hundreds of feet above each other.
I made these images from the Ticino riverbed using my Lumix LX7 on Saturday 16 April 2016.
Denis McCabe, Gerry Conmy, Stephen Hirsch and I were visiting the line to make photographs before the new base tunnel diverts traffic at the end of the year.
A southward passenger train on the top level of Biaschina loops.A few minutes later the same train appears on the middle level. Lumix LX7 photo.Finally, with little warning, the train emerges from the tunnel on the lowest level of the Double Helix. Lumix LX7 photo.
En route to Milan, this Italian State Railway ETR610 high-speed tilting train was ascending the Gotthard Pass just south of Gurtnellen, Switzerland.
For this image I blended several techniques.
To emphasize the wild flowers in the foreground, I’ve held the camera low to the ground and used the tilting back screen to compose the angle. (Aiding this approach is the FujiFilm X-T1’s built in line-level which appears as a ‘heads up’ display on the screen.)
By applying a Lee graduated neutral density filter to the front of the lens, I’ve maintained highlight detail in the sky.
My adjustments the RAW file in post processing lightened shadow density and increased color saturation to help make for a lush scene.
Notice the four layers: foreground, middle ground (the train), near background (the village of Gurtnellen), and the far background (snow crested peaks).
Once the new Gotthard Base tunnel is open to traffic at the end of this year, scenes such as this one of the Italian tilting train on the old route may be rare.
Thursday, 7 April 2016, Irish Rail’s IWT Liner was blocked at Islandbridge Junction. This gave me the opportunity to work some less common angles in addition to my common viewing point (often featured on Tracking the Light).
Irish Rail 219 with Dublin to Ballina IWT liner.
By holding my FujiFilm X-T1 above my head at arm’s length and tilting the camera’s live-view panel screen downward, I was able to make this view looking over the wall at the St. John’s Road roundabout in Dublin.
Why not try this more often? Simply because I’m not tall enough to see over the wall, so to make this view I’m actually using the camera to view the scene. It’s tiring work to hold a camera above your head while waiting for trains to appear.
The other day I was at the St. John’s Road roundabout. A Mark4 set was blocked as an in-bound ICR (intercity railcar) bound for Dublin’s Heuston Station over took it on the middle road.
The Gullet is the three track section in a cutting on approach to Islandbridge Junction in Dublin.
Using my Lumix LX-7, I made this photo by holding the camera over the wall and gauging composition from the live-view digital display at the back of the camera.
I lightened the shadows in post-processing to improve contrast.
For the next couple of weeks Tracking the Light will be on auto-pilot while Brian is on the road. Posts should appear daily having been pre-programmed into the holding queue.
I like to have at least two cameras handy. This especially true when I’m in a situation where photographic opportunities are rapidly unfolding.
These days I usually have both my FujiFilm X-T1 and Lumix LX7 at the ready.
Both are very good image-making machines, yet each has its strengths.
My Lumix is great for candid views and situations where it isn’t necessary or practical to have the camera at eye level. Often I use strictly with the live-view rear screen.
Panoramic composite view inside one of RPSI’s Cravens carriages.
Cravens carriage prepped and ready for passengers.The day’s scheduled running times as per Irish Rail.Footplate crew at Connolly.Engine 461 at Connolly Station; camera held high at arm’s length to clear the heads of spectators on the platform.
As part of the Easter Rising Centenary several Dublin post boxes have been temporarily painted red to mark significant locations of this historic Irish event.
Exposed using a FujiFilm X-T1 fitted with Zeiss 12mm Tuoit lens; contrast adjusted on site with a Lee graduated neutral density filter.
Mark Healy suggested this location to me as a place to photograph one of the specially painted post boxes with the LUAS. It is located near the Royal College of Surgeons across from St. Stephens Green.
Exposed using a FujiFilm X-T1 fitted with Zeiss 12mm Tuoit lens; contrast adjusted on site with a Lee graduated neutral density filter.Exposed using a FujiFilm X-T1 fitted with Zeiss 12mm Tuoit lens.
This quiet overhead crossing of the quad-track is just past the 8 ¾ milepost from Dublin’s Heuston Station.
It offers an open view of the line with a favorable angle for down (traveling away from Dublin) trains mid-morning.
Milepost 8 3/4 as measured from Heuston Station, Dublin. Here an ICR passes en route to Portlaoise. FujiFilm X-T1 photo.An up ICR is only minutes away from Heuston Station. FujiFilm X-T1 photo.Cross lit view of another up ICR. The wire across the line south of bridge can be problematic.Always nice to catch an old 071 working the IWT liner. Here 088 does the honors. FujiFilm X-T1 photo.These days you can often IWT boxes on the liner of the same name.
It takes a tuned interest in Irish Rail’s operations and a bit of luck. to time a visit to coincide with passage of the weekday IWT Liner (International Warehousing & Transport container train between Dublin and Ballina) and the more elusive HOBS (high output ballast system).
Getting the clouds to cooperate is trickier yet again.
Clear blue sky for the down Mark4 to Cork. But in Ireland the clouds cross the sky at an alarming rate. FujiFilm X-T1 photo.A mix of sun and cloud greeted the up HOBS. It can drive you batty. FujiFilm X-T1 photo.And there it goes! Soon the HOBS will be stabled in the old Guinness sidings at Heuston. FujiFilm X-T1 photo.
A couple of weeks ago Colm O’Callaghan and I spent a strategic 45 minutes at Stucumny Bridge.
Even if you fail at catching the freight on the move, there’s always a steady parade of passenger trains.
Last Friday, 11 March 2016, I went up to my favored Irish local location; Islandbridge Junction. This is a handy place for me.
This is great place to catch a freight train exiting Dublin’s Phoenix Park Tunnel on a bright clear day, yet can be visually problematic on a dull day.
On this day, I thought it would be a good place to experiment with a Lee graduated neutral density filter as a means of controlling contrast and allowing for a more effective overall exposure.
The filter I use offers subtle 2/3s of a stop gradation. This is adjustable both up/down and rotationally left/right.
I made a few test photos with and without the filter to gauge my exposure before the IWT arrived with Irish Rail 088 in the lead.
A similar effect can be accomplished digitally, yet the digital effect doesn’t add information to the RAW file, but only makes a visual adjustment in the final image.
In other words to apply the filter digital may be viewed as a ‘correction’ rather than an in-camera technique. Yet, it is often easier to apply a filter in post-processing than in the field.
I’ve used both methods depending on the circumstance.
Below are some results.
Test photo to gauge comparative exposure. This was made without the filter. My concern is getting adequate exposure in both the sky and foreground.Test exposure with the graduated filter. Here I’ve been able to lighten the foreground slightly while holding detail in the sky.Here’s a test view using the filter. I’ve achieved a good overall balance. (Sorry, the filter won’t make the sun come out.)Here we have the ultimate objective. To make a balance image of Irish Rail’s IWT Liner. It really about making the most of a gray engine on a gray day.
This gives a nice overall of my experiment, but in the middle of all this I got a little greedy. Using my zoom lens on the FujiFilm X-T1, I made a tight view of the IWT (with the filter).
As is often the case with last second changes, I didn’t get my exposure quite right. My feeling was that the RAW file was about 1/3 of a stop too dark.
Nice try, but my exposure was a bit dark.I imported my RAW file into Lightroom and made a variety of small corrections. First I altered the level. I also lightened up the entire image slightly and warmed up the color temperature. Is this an improvement?
As with most of my photography, I consider this a work in progress. In all likelihood, before long I’ll be back at Islandbridge Junction to further refine my experiment.
It was a day of big excitement. Up north, Guilford was in a knot as result of a strike action. Bob Buck phoned me early in the morning to say that ‘The Boot’ (the colloquial name for Amtrak’s Montrealer) was detouring to Palmer on the Central Vermont, then west on the Boston & Albany (Conrail).
Using my dad’s Rollei model T loaded with Kodak Tri-X, I made the most of the unusual move.
This was nearly a decade before Amtrak’s Vermonter began to regularly make the jog in Palmer from the CV/New England Central route to the B&A mainline.
And, it was only four months before Conrail ended traditional directional double-track operations between Palmer and Springfield.
Amtrak 61 followed CV’s southward road freight to Palmer arriving at 11 am with Canadian National M-420 2557 in the lead.. Here I pictured it near the old Boston & Albany freight house in Palmer, Massachusetts. Note the all heritage consist (except of course for the F40).An Amtrak CF7 had come out from Springfield to assist with the reverse move necessary to bring the Montrealer westward over the B&A.
I’d met some photographers at the Palmer diamond and encouraged them to take advantage of my favorite vantage point at the rock cutting at milepost 84, just over the Quaboag River from the Palmer Station.
As detouring Amtrak number 61 approached with a former Santa Fe CF7 leading the train to Springfield, we could hear an eastward Conrail freight chugging along with new GE C30-7As.
Moments after I exposed the classic view of this Montrealer working the old number 1 track, TV6 blasted east with intermodal piggybacks for Worcester and Boston. I was using the Rollei with a 645 ‘Superslide’ insert that allowed me 16 frames per roll.Conrail TV6 passes Amtrak’s Montrealer on the double track west of the Palmer diamond. Four months later, in July 1986, Conrail cut-in CP83 which ended double track operations between Palmer and the new CP92 in Springfield.Sometimes when the action is unfolding its best to just keep exposing pictures. Here I was cranking the Rollie as quickly as I could.
This is among my favorite sequences that show the old double track in action.
Some of these photos later appeared in Passenger Train Journal. Long before I was the Associate Editor of that magazine.
Last night, as advertised, I presented my program to the Irish Railway Record Society in Dublin.
I had a large and receptive audience. There were more bodies than seats.
The program was in two parts, divided by a tea break (as per tradition). After a few slides from America, I focused on the main event: Ireland as I saw it 10 years ago.
I apologize: there were no photos of the DART or 29000-series CAF-built railcars, and I probably offered a disproportionate number of views of the last two operational class 121 diesels.
For those curious about my camera equipment: at the time I was in a transition between Nikon and Canon systems, while I was also making good use of a Contax G2 rangefinder. Color slides were exposed with lens ranging from a 16mm Zeiss Hologon to a 400mm Tokina telephoto.
In 2006, I was more than 2 years away from exposing my first digital photo. I was like the Norfolk & Western in 1953, and still firmly committed to the old technology. Most of the slides were exposed using Fujichrome Sensia2 (ISO 100), although I also used some Fujichrome Velvia 100, Provia 100F, and Provia 400F, as well as the occasional roll of Ektachrome.
Norfolk Liner at Bekan. Exposed on Fujichrome 100 with a 180mm Nikkor lens. Contrast adjusted in post processing.I had dual tripods and dual Nikons at this location. For this follow-up view of the same Norfolk Liner, I used a 400mm Tokina telephoto that I bought from Doug Moore back in 1992. I still have it with me in Ireland, although there’s not many places on this island to make effective use of such a long lens. Bekan (east of Claremorris) offers ths unusual ‘flight of stairs’ effect.
Some weeks ago when I was in Massachusetts, I was helping my mother organize books in our library. Some shelves hold books that have resided there since 1973.
My mother surprised me by saying, “I put these books here thinking that you and your brother would read them. But you never did. I found that very disappointing. They just sat here all these years.”
I looked carefully at the shelf.
‘These books?’
Here was a diverse collection of subjects: philosophy, history, art criticism, architecture, economics, psychology, social affairs, literature, photography and biographies among other topics.
I took one from the shelf and opened it. Inside my name was written in blue ball point.
“I’ve read almost all of these books. See here’s my name.”
I picked up another. “I read this one twice, and I wrote a college paper on this one over here.”
“Really? When did you read them?”
Starting about 1983, whenever I’d go out making photographs, I bring a book with me. If I went to the Berkshires to photograph the Boston & Albany, I always have a book to read while waiting for trains to pass. Up there in the rocks and trees along the West End, I read countless books, including many of the books on that shelf. If I took a long train ride I’d always have a book with me.
The railroad is my reading room. How many books have I read waiting trackside? In the 1980s I’d often read within sight of this old bridge on Boston & Albany’s West End. Image exposed on Kodak Verichrome Pan using a Rolleiflex Model T, October 20, 1985. What was I reading that day? Nietzsche or a book about the Roman Empire?
“Even now, there’s one of these books on the back seat of the car.” (Veblen’s The Theory of the Leisure Class).
“I have a photo of Sean reading the book on propaganda at the Twin Ledges twenty years ago. And I remember reading all about the Borgia’s one summer’s day in the late 1980s waiting for Conrail.”
“I never knew that!” She said delighted.
Some of the books I’d read so long ago that their words had blended with my own thoughts.
The more I thought about it, the more the discussion about bookshelf astounded me.
Here, I read all these books that had shaped my view of the world and with it my photography and it never occurred to me that my mother had specifically put them there for me to read, nor did she know that I’d read them!
Yesterday (March 1, 2016) I posted a view of a CSX intermodal train working upgrade at Warren, Massachusetts in the nice morning sun. This was a nice start to a very productive day.
What I didn’t explain was the back-story.
Although I’ve been at railway photography for more than four decades and I spend a lot of time at making my photographs. Occasionally I make mistakes.
Some are minor ones. Others can have more serious implications.
On Saturday February 26th, I was traveling with Mike Gardner. We’d met Tim Doherty and Pat Yough at CP83 (near the Steaming Tender restaurant) in Palmer, Massachusetts.
Shortly after we arrived, CSX’s talking equipment detector in Wilbraham sounded, alerting us to the eastward train. We decided to drive to West Warren to make our photographs. We had ample time to do this, but not enough time to waste.
Upon arriving in West Warren, I noticed that both my Lumix LX7 and FujiFilm X-T1 cameras had only a few photos left on their respective cards. I should have checked this the night before and put fresh cards in the cameras.
However, since I had a minute, I hastily put new cards in the cameras and wiped them clean.
This was the photo presented with yesterday’s post, but I thought I’d put up again for context (it doesn’t cost anything extra to show it twice, so why not?). Exposed with a FujiFilm X-T1 digital camera.
The day was extraordinarily productive. Mike and I photographed trains on CSX, New England Central, Berkshire Scenic and Pan Am Railways, making it Millers Falls, the Hoosac Tunnel, and Washington Summit among other notable locations.
My Fuji camera was acting strange.
New England Central local freight crosses CSX’s Boston & Albany line at Palmer.
Among other problems, it was taking forever to store the images from the camera buffer to the card. I’d expose a burst of images, and two minutes later it would still storing them.
Meanwhile the Lumix was giving me so much bother, I put it down and instead opted to work with my Canon EOS 3 loaded with slide film.
Pan Am Railway’s EDRJ (East Deerfield to Rotterdam Junction) roars west at Wisdom Way in Greenfield. I was snapping away, but something wasn’t right. My camera was acting weird!
By the end of the day, I notice that the 32GB card in the Fuji was nearly out of space, but I’d only exposed about 150 frames. (Normally I get about 840 images saved as RAW and JPG on a 32GB card). Something was wrong.
I was getting a bit worried, because the next day I was booked on a transatlantic flight, and there’s nothing worse than having serious camera trouble when traveling.
A little later in the day, here’s the same EDRJ climbing toward the Hoosac Tunnel at Zoar, Massachusetts. I recalled a day about 30 years ago at this precise location when the last thing I was worried about was the card in my digital camera!
Digital cameras don’t start acting strange because they are in a bad mood.
However, when I went to down load my photographs, I quickly discovered the source of my problems.
Between a stop for lunch and our next destination, Mike and I paused at Renfrew on the old B&A North Adams branch to photograph the Berkshire Scenic train. This was our second trip along the branch in less than two weeks.
In my rush to put cards in the cameras, I inadvertently put the card formatted for the Fuji in the Lumix and vice versa. Also, rather than re-format the cards, I simply wiped them. Each type of digital camera uses different protocols for storing data, which is why the cameras were acting slow.
I put new cards in each camera and re-formatted them (which effectively erases all data on the card). Problem solved.
Tip for the day: Don’t mix your cards up, take the time before embarking on a fast-paced day to make sure you have clean, formatted cards in your digital camera(s).
Or, if you use film, to make sure your camera is loaded and that your ISO setting is correct.
Amtrak 449, the Lake Shore Limited passes Muddy Pond in Washington, Massachusetts.Amtrak 448 meets a CSX freight at CP83 in Palmer just after sundown. Exposed with my FujiFilm XT-1 with Zeiss 12mm Touit and Lee graduated neutral density filter. ISO 3200. At this stage the camera was barely functioning and taking forever to store images. I’m amazed I got anything at all!
Over the years I’ve traveled with dozens of railway photographers with whom I’ve learned elements of railway photography.
Among the most important lessons I’ve learned, one has has very little to do with specific railways, locomotives, signals, or old stations. It doesn’t specifically relate to different types of equipment and isn’t really about cameras, types of film, or the definitive virtues of one media versus another.
Normally, I avoid philosophical preaching and I remain reluctant to instruct people how to conduct their affairs.
However, I think this tip may help some photographers—this is if they choose to accept it and react to it.
So, what is it?’
When you’re out making photographs avoid your invisible barriers— those things in your head that discourage you from being in position to make great photographs.
In other words try to avoid letting your arbitrary personal opinions, feelings or established prejudices from materially interfering with your focus on photography.
By ‘invisible barriers’ I mean things you can control and not personal obligations, physical limitations or other real impediments. The invisible barriers are what some people call ‘foibles’.
Some examples:
‘I don’t like to get up early.’
‘I like to eat a full breakfast before making photos.’
‘I don’t like cloudy days.’
‘I don’t like engines that are running long hood forward.’
‘I don’t like traveling more than 45 minutes from home.’
‘I don’t like driving in rush hour traffic.’
‘I don’t like locations that are too close to rivers.’
‘I hate the cold/heat/wind/dry air/rain/snow/dust storms/tornados.’
‘I only like passenger trains/freight trains/short lines/mainlines/Alco diesels.’
‘I don’t like tree branches.’
‘I only like trains climbing grades with a defined row of hills in the distance.’
‘I like bright sunny days.’
Any or all of these things may be true for you. However, when any of these things get between you and a photographic opportunity, your photography may suffer.
Not the dreaded single diesel long-hood forward!In 1994, I spent three rainy days in the Oregon Cascades. It wasn’t comfortable, but I was offered a host of incredible photographic opportunities. For me the results were worth the trials.
If you want to push your boundaries consider reconciling those arbitrary foibles that may be preventing you from being in place to get the best possible images.
Being in-place is key. If you are not there, you can’t a make photo. All the excuses in the world are no substitute for being there: so, Be There.
Push your limits. Get over the small things that are your invisible barriers. Work out what may be keeping you from your optimum photographic potential.
Not a good tip? Here’s a question:
When documenting a scene what’s the benefit of allowing invisible barriers to shape your photograph or prevent it? Answer that for yourself, not for me. I’m just giving tips.
In the last few months I’ve been lucky to catch a variety of the more obscure operations on the Pan Am Railways system.
Last week, Mike Gardner and I spent the afternoon around North Adams, Massachusetts.
EDRJ arrived with two locomotives to drop for local freight AD-1.
Pan Am AD-1 is seen on the Boston & Maine mainline at North Adams. Exposed on HP5 using a Canon EOS-3 with 20mm lens.Boston & Albany on the left, Boston & Maine on the right. Exposed on HP5 using a Canon EOS-3 with 70-200mm lens.
Although, we had high hopes of following EDRJ west toward the Hudson River Valley (uttering the now-famous battle cry, ‘To the River!’), Pan Am had other ideas.
History will forgive them.
So instead we followed AD1 down the old Boston & Albany North Adams branch to Zylonite.
Zylonite on the old Boston & Albany, now Pan Am’s Adams branch. Exposed with a Lumix LX7.Who would have thought a high-hood GP40 would be working the old North Adams Branch! This was once the territory of Alco road switchers. Exposed with a Lumix LX7Pan Am local freight AD-1 on the Adams Branch at Zylonite. Exposed with a FujiFilm X-T1.Looking north toward North Adams.Former Canadian National Railways GP40-2L wears a nice shade of blue. Exposed with a Lumix LX7.
After a taste of this surviving segment of B&A’s extension to North Adams, we followed the abandoned vestige of the line that runs southward to Pittsfield, then made the most of the late afternoon on the former B&A mainline!
Too often I find that a brand or a ‘team theme’ is applied by photographers to railway photography. Their intent may be good spirited, but the results can be limiting.
Specifically in regards to equipment: Cameras and lenses are tools. (As are digital sensors and film emulsions). While each camera system has advantages and disadvantages, obsessive loyalty to one brand or another may stand between a photographer and their ability to make better photographs.
Over the years, I’ve worked with a variety of different cameras. Most have had their strengths, but also limitations.
30 years ago, I worked largely with Leicas. The lenses were very sharp, and when I loaded them with Kodachrome 25 or Kodak Panatomic X, I often produced very acceptable results.
20 years ago, Nikons were my primary tools. I was fussy about my selection of lenses, and I experimented with a variety of films.
10 years ago, I carried a Contax G2 range finder loaded with Fujichrome with me everywhere, yet exposed many images with Canon EOS3s.
New England Central southbound 611 crosses the Millers Falls high bridge. For this image I used one of my old Canon EOS3s fitted with a 100mm Canon lens and loaded with Ilford HP5. I processed the film according to my custom tailored recipe. (See yesterday’s post for details). Why Canon? Why black & white film? Because it these combinations worked for me.Moments after I exposed the black & white photo above, I made a burst of digital images with my FujiFilm X-T1. In this situation I have the best of film and digital photography, while working with two different camera systems. Standing next to me Mike Gardner exposed photos using his digital Leica M.
Today, I work with a Lumix LX7 and Fuji X-T1 digital cameras, as well as my old Canons and Nikons loaded with film. Occasionally, I borrow my dad’s Leica M rangefinders. Depending on the circumstances I’ll use digital or film, sometimes working with both at the same time.
Over the years I’ve made photos with Rollei 120 camera, and Hasselblads, Sinars and Linhofs, Pentax SLRs, along with a host of other equipment.
Why do I choose one camera over another?
Not because of loyalty to one brand or another. Not because one uses film and other is digital. But, because I’ve learned the strengths and weaknesses of individual camera systems and specific camera models. No two camera systems work the same way, and thus in similar situations no two cameras perform the same.
I’m not a team player. I won’t use a Canon because it’s a Canon, or grab my Lumix LX7 simply because it is a digital camera. I work with these tools because of the results they can produce in different circumstances.
Optical quality is always important, as is ease of use and relative affordability. But these days camera weight is often a deciding condition when I choose which tools to carry. My camera bag of the 1990s weighed about 4 times what my bag does today.
My Lumix LX7 is a great tool for making grab shots. Here Mike Gardner and I were pacing a New England Central freight. I rolled the window down, set the aperture to its smallest hole to force the camera to use a slow shutter speed (I had the Lumix in ‘A’ mode which allows me to select the aperture while the camera picks the shutter speed based on its internal meter). At the time I had three cameras to chose from, and I instantly opted for the Lumix.
I’m always on the lookout to see what a new piece of equipment can do. And, I’m always interested in finding ways to make old equipment work for me.
In the end, my camera selection is about the result and not the camera.
For this roll of film I made some minor adjustments to the basic formula.
The goal of my special process is to allow for a black & white negative that when scanned provides optimum tonality and contrast without the need for post processing adjustments.
This is significant for two reasons: 1) I’ve maximized the film’s tonality, thus allowing to capture the most amount of information. 2) I’ve minimized the amount of time I need to spend adjusting individual images.
Exposed on February 18, 2016 with Ilford HP5 black & white film. Processed in Kodak HC-110 1:32 for 5 minutes at 68 degrees F, three bath fixer, and then selenium 1:9 for five minutes; rinse and dry. Scanned digitally using a Epson V600. No post processing contrast or exposure adjustments. Original exposure was f16 1/500th of a second with 20mm lens.
With this photo, I scanned the original negative, and then scaled it in Lightroom while applying my water mark. I did not make adjustments to exposure, contrast, or similar. This is in essence and unmodified scan.
Here I’ve intentionally selected a very contrasty scene. This demonstrates the success of the process and makes for a dramatic photograph of modern railroading.
By using HP5, which is rated by Ilford at 400 ISO, I’ve intentionally selected a comparatively grainy film. This adds texture and grittiness to the image. I wonder how it will appear on your screen? On mine it is exceptionally sharp with broad tonal range.
In yesterday’s post (Unexpected Surprise: Stumbling on to one of the Rarest Railway Operations) I wrote of how we found the Battenkill local freight at Eaglebridge, New York.
It was sunny at Eaglebridge, but ominous clouds were rolling in from the west.
On one level the clouds benefitted our photography, since we’d be fighting the sun on a northward chase.
I opted for something different. The sky was a textured tapestry of clouds and light. The technique I’m about to describe isn’t really bold, nature and architectural photographers use it all the time.
I fitted my FujiFilm X-T1 with a Zeiss 12mm Touit (previously described) and a moveable Lee graduated neutral density filter (with a 2/3s of a stop range).
This arrangement allows me to better balance the exposure differential between the bright sky at the top of the frame and the inky dark shadows toward the bottom of the image. The Lee system allows me to rotate the filter and adjust it up and down.
You can make similar adjustments in post processing using a digital applied graduated filter, however by using the filter on-camera I’m allowing the camera sensor to capture greater amounts of data, thus expanding the dynamic range of the image.
Specifically, I can adjust the filter to expose for the sky to the point where highlight and shadow detail are adequately captured which allows me to lighten the shadow areas at the bottom of the photo.
In some situations, the image will not require any post processing. However I found it was still necessary to make some post processing adjustments to make the image appear better to the eye. I fine-tuned my exposure and contrast using Lightroom.
All four images in the sequence below were made using my FujiFilm X-T1 with a Zeiss 12mm Touit Lens. (However, the introduction photo at the top of the post was made with a 18-135 lens, unfiltered.)
Here’s my scene unfiltered. I’m at a grade crossing south of Cambridge, New York. The clatter of Battenkill’s RS-3 with 244 diesel can be heard in the distance. I’ve exposed for the foreground, which has the undesirable effect of losing most of the texture in the sky.With this image, I’ve attached the Lee graduated neutral density filter. This darkens the sky and features a tapered graduation which should appear virtually seamless. The result is that I can better hold detail in the sky and in the foreground.Now the Battenkill has arrived. This is the un-modified RAW file (except for scaling necessary for internet presentation). I’ve intentionally made my exposure a bit on the darkside, knowing I can locally lighten shadow areas in post processing. Again, by using the filter, I’ve been able to allow the sensor to capture a greater dynamic range. (a larger span of dark to light). When I exposed this image I gauged exposure using the in-camera histogram to maximize the amount of data captured by the sensor and to minimize loss of detail in shadows and highlights.Using Lightroom, I made some nominal post-processing adjustments to contrast and exposure, specifically focusing on the shadows and midtone areas of the locomotive. My intent was to better balance the image as it appears to the eye. Obviously, depending on personal taste, it is possible to make a variety of adjustments to the final image. Here I tried to faithfully recreate a dramatic scene. Personally, the wavy rows of harvested corn make for some of the most interesting texture. Yet the primary subject remains the Alco RS-3 diesel.
I was surprised to learn that I managed to stump most of the viewers with my February 2016 Mystery Photo! I thought for sure that someone would instantly recognize this exceptionally obscure section of line.
Melrose.
I had many very good guesses from many informed readers.
(Those of you viewing on Facebook/Tumbler/Google Plus etc, you will probably need to click on Tracking the Light to see the full post with answers!)
The most popular guesses were focused on the Mass-Central.
(By the way, thanks for the tips on locations!)
I’m sorry, but these answers and many of the other were incorrect.
I opted for a snow covered scene that obscured many clues. I thought this would be an added challenge.
The tracks are in Connecticut. They are not on the former Central Vermont.
Norbert Shacklette correctly guessed the predecessor railroad and the correct current operator but could not guess the specific location.
The only truly correct detailed guess was supplied by an exempt viewer. (I felt it was unfair to allow people whom I pointed out this location in the past to participate).
In the future I will try to supply juicier clues.
I made this photograph on February 6, 2016 at the Connecticut Route 140 crossing of the old New Haven Armory Branch in Melrose.
Historically this line was part of the New York & New England system, which was among the lines absorbed by the New York, New Haven & Hartford Railroad.
Today the line is under the administration/operation of a short line titled Central New England Railroad. However, confusingly this segment was not operated by the historic New Haven component company known as the Central New England.
During the late Penn-Central and Conrail periods, this section of trackage was not shown on many maps and was largely overgrown. It has been cleared in recent years. To date, I’ve never seen a train here, although I’ve crossed the tracks dozens of times.
The maps below show the specific location and the angle of the photograph. It is my hope that the arrows clearly indicate to you where I made the image.
Thanks for participating!
The RED arrow points at Melrose, Connecticut. The photo was made in the morning looking in a southeasterly direction on the old New Haven Armory Branch immediately south of the Route 140 crossing near St. Mary’s Cemetery.A detailed view of the 1946 New Haven Railroad system map with a orange arrow pointing in the direction I made the photo. The tip of the arrow is approximately where the photo was made. The end of the arrow is irrelevant.Period USGS Topographical map showing Route 140 in Melrose. I’ve circle the location of the photo with an arrow to show the direction I was pointing. (only the point and the angle of the arrow are relevant, the unpointed-end is not important.)
The other day I was scouring the files for a photo Amtrak’s Sunset Limited as an illustration for an article I was writing.
Instead, I found this slide; one of hundreds of images I made along SP’s Sunset Route in southern California during the early-mid 1990s.
A Cotton Belt GP60 leads an eastward Southern Pacific freight over Beaumont Hill near Cabazon, California on the evening of January 29, 1994. Kodachrome 25 slide scanned with an Epson V750 Pro and processed using Lightroom.
I’d been following this eastward Southern Pacific freight over Beaumont Pass and I exposed this view near Cabazon on the east slope. The setting sun was enhanced by the effects of Los Angeles-area smog that acted as a red filter (an effect of heavy particulates).
I was working with my Nikon F3T and Kodachrome 25 slide film. Always a favorite combination for image making on Southern Pacific Lines.
Tracking the Light presents new material every day!
February 8, 1994, I used my Nikormat FTN with a Tokina 400mm lens mounted on a Bogen 3021 tripod to make this view on Fujichrome 100 slide film of a Boeing-Vertol Light Rail Vehicle pausing for passengers on the N-Judah line.
It was the end of the day and the colors of a sunset sky are reflected in the windshield of the LRV. For me it is the contrast and subtle hues of the evening light that make this photo stand out.
San Francisco’s Muni light rail offers endless opportunities for dramatic photos on the streets of this famous California city.
If I recall correctly, my shutter speed was 1/60th of a second. The slide is slightly dark (about ½ stop) so I lightened it a bit in post processing.
A few weeks ago I posted some vintage Ektachrome slides of MBTA’s Mattapan-Ashmont trolley line that I made with my old Leica 3A when I was 12 years old.
Among these was this view at the Milton station that showed Conrail’s former New Haven Railroad tracks in addition to MBTA’s trolley line.
My 1979 Ektachrome view: I was fascinated by the ‘heavy rail’ tracks on both sides of the trolley line. Here is evidence that Conrail was still serving the former New Haven branch as far as Milton. There’s virtually no evidence of the freight operation today, and it takes a bit of imagination to figure out where the tracks were. Notice that I didn’t allow a PCC to interfere with the scene: this was about the PFE refers!
The trolley line had been adapted to use part of the railroad right of way, and yet it was still necessary to serve freight customers, so tracks from both operations had co-existed for decades.
Milton from approximately the same angle as the 1979 view above. More than just the tracks have changed. I exposed this with my FujiFilm X-T1 digital camera at the end of January 2016.
Today, the freight railroad at Milton is but a memory. (And, if news reports prove correct, the trolley may soon vanish too!). Take nothing for granted.
This is a slightly tighter view of Milton as it now looks. No PFE refers here, nor tracks for them to rest upon. This focal length more closely mimics the 50mm Leica Sumitar lens that I used in 1979.
I made these Now and Then views from approximately the same place looking in the same direction, but nearly 37 years apart.
An of course, I waited for a PCC. On Sunday’s trolleys operate about every 8 minutes in both directions. FujiFilm X-T1 photo.
In yesterday’s post [MBTA PCCs with a Cotton Candy Sky] I described my philosophy and technique with regards to working with a RAW file to maintain a high-level of detail with a textured sky.
With today’s post, I’ve selected a similar image as another example of how I’ve implemented adjustments using the program Lightroom.
The final image is intended as an ‘over the top’ example of how to create a fantasy image from a RAW file. I’m neither endorsing nor condemning photo fantasies, (they appear often enough on the internet), but simply describing one method of producing this result, as well as my interpretation of the scene as I saw it.
Example 1; this is the scaled RAW file, unaltered except for necessary sizing. Notice that the sky is not as blown out as with yesterday’s example. I exposed this image to favor the sky, making it about one half stop darker than the image presented yesterday. I expected to retrieve shadow detail to present a better exposure balance in the final image. Had I exposed for the streetcars, the sky would have been very over exposed, possibly beyond the ability to make correction.
Example 2. As with yesterday’s second example, I’ve digitally introduced a graduated neutral density filter to the sky. This helps darken the sky relative to the lower half of the image while better balancing detail and color in the clouds. I’ve not yet altered the shadow areas so the streetcars still appear too dark and dull.Example 3. Here I’ve lightened the above file by adjusting the ‘shadows’ slider and made nominal global adjustment to the mid-tone areas using the ‘clarity’ slider which gives the image a bit of snap. My goal was to make the streetcars appear more or less as they did when I made the photo. Normally this would be my ‘final’ interpretation. However for the sake of the exercise and to gauge public opinion, I’ve continued with my manipulation of the RAW file (see below).Here’s my fantasy. I’ve over-enhanced the RAW file by pushing the ‘clarity’, ‘saturation’ and ‘vibrance’ sliders to the right. The manipulation is easily accomplished and the result jumps out and grabs you. However, let me be clear: this is a fantasy, the scene never looked this way in real life.
However, if this image helps save the Mattapan-Ashmont trolley from extinction, then I’m all for fantasy!
The sky can make all the difference in a photograph. However, often the way a modern camera presents exposure tends to push sky detail toward over exposure (that means its too light).
The result is a washed out sky that loses all the color and detail that made the scene interesting.
Thankfully, with careful exposure and post processing manipulation of a RAW file, it is easy enough to balance sky detail with the primary subject.
I made these photos the other day at Mattapan during a visit with Tim and Will Doherty and Pat Yough. All were exposed using my FujiFilm X-T1 with a Zeiss 12mm Touit lens
I processed the photos using Lightroom (an Adobe program that allows for easy adjustment of the the RAW files).
My first move was to digitally introduce a graduated neutral density filter across the sky to locally adjust contrast and exposure with an emphasis on retaining highlight detail. Next I lightened shadows and adjusted mid-tone detail with the clarity sliders.
My intent was to recreate the scene. It would be easy enough to create a total fantasy using these tools. That balance is purely subjective.
Example 1
Example 1; this is the scaled RAW file, unaltered except for necessary sizing. Notice that the sky is blown out, especially at the left while the streetcar and tracks are too dark. I exposed this image to favor the sky, knowing in advance that I could retrieve shadow detail to present a better exposure balance in the final image.An intermediate step for example 1: Here I’ve introduced a digital graduated neutral density filter that is only applied to the sky area. This makes the clouds darker while display greater detail in highlight and mid-tone areas. I haven’t altered the overall balance by adjusting contrast or exposure. As a result the streetcar and ground area are still too dark (because I’ve done nothing to address these areas).Example 1 final image: Now, I’ve made global adjustments by lightening the shadow areas and making nominal changes to the mid-tone contrast using the ‘clarity’ slider. This gives the streetcar and ground a bit of ‘snap’.
Tomorrow I’ll present a more dramatic example complete with ‘fantasy’ treatment. Stay tuned!
Denis McCabe, Stephen Hirsch and I were on a week-long exploration of central Austria in January 2012. I made this view through the windscreen of our hired car as we drove through a long Alpine tunnel.
Lumix LX3 view from inside an Alpine tunnel. For effect I exposed the photo at 1/2 second, which makes for a painterly like blur of the walls, road surface, and roof, while blurring the lights. The camera’s built-in image stabilization helps minimize lateral movement.
Not my finest print, but it was the best I capable of at the time. Today, what I find interesting is the effort I made at captioning the print, which has preserved the spirit of the day and the relative significance of the image. Information distinguishes the train pictured from that of a generic move to a specific train on a specific day and highlights the relative importance of the image.
Here’s an old print. I exposed this years ago. It shows an Amtrak train in the snow someplace. If I had to guess, I say it was made somewhere in New England in the mid-1980s/early 1990s based on the equipment.
Except I don’t need to guess. I know that it was exposed on the morning of January 16, 1984 and shows Amtrak’s late-running Washington D.C. to Montreal Montrealer passing South Deerfield, Massachusetts.
I chose to display this photograph because it has a decent caption on the back. My language skills weren’t fantastic, but all I was trying to do was convey the vital information that related to the photograph. I typed my caption up on label using an IBM Selectric typewriter (which imprinted letters with a rapidly rotating ball) and pasted it to the back of the print.
In the caption I was trying to do was convey the vital information. At the time, I’d hope to send this to a magazine. Catching the Montrealer in daylight was a real coup! (Or so I thought at the time.).
I find this photograph interesting for other reasons too. As regular viewers of Tracking the Light may be aware, I’ve made several recent views of Amtrak’s Vermonter at this same highway crossing (North Hillside Road) and so this makes for an interesting comparison view.
The primary reason I’ve posted this today is to provide an example of how a simple caption can solve many mysteries. Instead of a generic image of an Amtrak train kicking up snow, we instead know many of the crucial details; what, when where and why.
These details make the photo more relevant, and potentially more valuable as a record.
These modern locomotives have been on the move in New England for a few months now, but they managed to elude me. Or my camera anyway. (I saw one in Worcester some weeks ago.).
Pan-Am Railways symbol SEPO typically operates with run-though locomotives. The eastward freight is pictured at Ayer, Massachusetts. Fuji Film X-T1 digital camera.CSX logo on a new ET44AH diesel-electric.
The Tier 4 are the most modern high-horsepower freight locomotives offered by General Electric. They are designed to meet EPA’s Tier IV emissions standards.
While similar in appearance to other late model GE freight locomotives, they have a distinctive large capacity radiator and vents at the back. This provides increased heat exchange area in the radiator cab is required to meet the stricter Tier 4 exhaust emission requirement using by using Exhaust Gas Recirculation
On the morning of Tuesday January 26, 2016, Pan Am’s SEPO is seen at the Willows, east of Ayer, where the Stony Brook Branch diverges from the Fitchburg Route. The Stony Brook handles Pan Am’s though freights to Maine and New Hampshire destinations. This set of three locomotives demonstrates an evolution in modern radiator profiles. The lead locomotive has the most modern Tier 4 design, while the second locomotive is one of GE’s Evolution Series that was in production from 2004-2014, third out is a 1990s era design: the AC4400CW .
On Tuesday, January 26, Bob Arnold, Paul Goewey and I found CSX 3308 working symbol freight SEPO (CSX Selkirk Yard to Portland, Maine) at Ayer, Massachusetts.
I always like to catch new power on the move and we caught this freight at several locations.
GE’s modern Tier 4 locomotives can be instantly recognized by their enormous radiator profile. When photographing these modern locomotives, a trailing view such as this one offers a better view of the technologically distinctive features.This telephoto trailing view emphasizes the radiators. FujiFilm X-T1 digital camera.
What about a classic three-quarter ‘roster view’ you ask? Well, I exposed that on color slide film, of course!
I work with photographs almost every day. Often, I’m faced with drafting captions for historic images and too often I find historic prints without adequate information.
Back in the day some conscientious photographer made the effort to preserve a scene. When they went out the reason for their photograph was often brutally obvious (to them).
Maybe a new locomotive was working the daily express, or the local passenger train was running late. Perhaps an old machine was nearly ready for the scrap heap, or something special was on the move.
Or maybe it was just a nice day to be out, and the photographer wanted to document the railroad action.
Here we have a nice photo of a nearly new 4-4-0. With a little bit of footwork I was able to discover that it was an Illinois Central engine. The location, date, and specific significance of the image at the time of exposure are a mystery (to me anyway). There is no information on the print. Even the photographer has been forgotten. The print is from my collection. A simple caption such as: JL Jones and crew pose with new 934 at Podunk, Mississippi, February30, 1879 would have been helpful (hold on sherlock, I made up that caption to serve as potential example. So, it is pure fiction, not speculation— thus the date).
Holding an un-captioned photo may present many mysteries that could have been easily answered at the time of exposure. But the photographer passed on and the significance of the moment has been forgotten; the railroad was merged out of existence decades ago and the location has changed beyond recognition.
And so here I am trying to solve a mystery. Often, I can figure things out. But not always.
There maybe clues, but will they help? If you could find the location today, you might see that the double track line in the old print was reduced to single iron and the old station was bulldozed years ago, the mills in the distance are now the site of a shopping plaza, and trees have grown up everywhere.
My late-friend Robert A. Buck was a stickler for captioning photographs. Time, date, location, train number, engine number and class, engineer’s name, and so on.
A captioned photograph is vastly more useful, more valuable, and more relevant than an uncaptioned print. Never assume that the viewer, or even the photographer himself/herself will remember the details. The passage of time tends to blur those things that once seemed obvious.
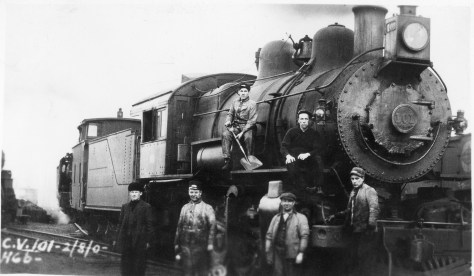
Here we have a wee bit of information. CV is for Cumberland Valley (not Central Vermont). The locomotive is a PRR Class H6b, engine number 101. A quick search of a PRR roster will reveal details about the engine. Also, we know it was exposed on February 8 or August 2, but the exact year is unknown. The men in the photo are obviously the crew, and knowledge of their uniforms and tools will give you an ideas as to their positions and roles; Engineer, Conductor, Fireman, Brakeman flagman, etc. But who are they? Where are we? Why? Who was the photographer? What was the significance of this image at the time? Mysteries, so far as I’m concerned.
A solution for future photos: take the time to write information on the images photos you make. If you caught something special, explain in detail. Never assume.
Be sure to include specifics regarding locations. Avoid potentially cryptic abbreviations.
Don’t make things up! Try to be as accurate as possible without wildly speculating as to important details such as date and location.
Don’t wait until you have 100,000 photographs that span 25 years to begin your task.
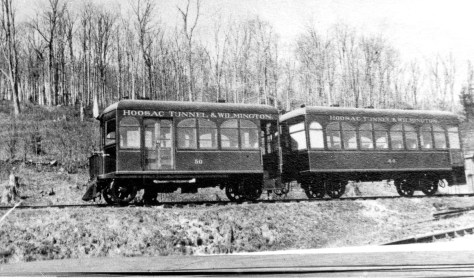
We know that this is a Hoosac Tunnel & Wilmington railcar and trailer. It looks relatively new and the numbers are displayed, so a search of rosters will reveal builder information and possible disposition. All other information is a mystery (there’s nothing on my print, not even the photographer’s name.) The photo is from my collection. Again I can speculate as to the year, location, etc.,, but that’s not my point. I’m not trying to solve this mystery, but rather offer an example of how a little bit of information in the form of a caption on the print would have gone a long way. Yet, what makes this photo fascinating to me is that its a rare example of a four-wheeled passenger vehicle built in the 20th century for an American railroad!
Beware: some time ago, an archivist told me that un-labeled photo collections are considered to be of low value to the historian. (His words were a bit stronger and involved trash receptacles).
A few final thoughts; when labeling old prints consider the type marker you use. Colored felt-tip pens are a very poor choice. For RC prints, consider a thin black permanent marker that won’t bleed, or a black ball-point pen with good action and ink that doesn’t smear. For paper prints a light pencil is a good choice, but don’t press down so hard that you damage the image area. Paste on labels are not good, eventually the glue will dry up (and fall off) and also the glue may bleed through. Digital images need captions too, but that’s a topic for another day.
More examples and more mysteries soon!
Tracking the Light Posts Daily!
Please help by forwarding Tracking the Light to your friends!
Back in March 1984, I wandered down to Palmer with my dad’s Rolleiflex Model T loaded with Tri-X.
It was a miserable day; typical early of early Spring wet, clammy and dark.
Yet, Conrail was running trains. A westward midday freight (remember those?) was blocked at the diamond for a Central Vermont train.
Using the Rollei’s square format, I composed some interesting images. Conrail’s Boston and Albany was still a directional double-track railroad back then. This was before the modern signals and single tracking that began in 1986.
I took the negatives home and processed the negatives in the sink, as I often did in those days. I was using Microdol-X for developer. I was cheap, and my developer was rather depleted by the time I souped this roll.
The result; unacceptably thin negatives that wouldn’t print well, even when subjected to a number 4 polycontrast filter.
Poor show! These negatives were thin and very hard to print. At the time it wasn’t worth my time to mess about with them. Thankfully I saved them for more than 30 years. Despite under processing, most of the essential information necessary for an acceptible image was retained in the original negatives. This is the unmodified file.
It was a just a dark day in Palmer. Conrail in 1984 was common for me, so I sleeved the negatives, filed them away in an envelope and that was that.
Until a little while ago, when through the improved tools available to me through Lightroom, I was able to finally get the results I desired from these old photos.
A few easy adjustments in Lightroom and I was able to extract most of the detail I saw back on that March 1984 day. Now I have some suitable dramatic images from a favorite period on the railroad.
After nearly 32 years, they are looking pretty good now!
Please note, if you are viewing this post on Google Plus, Tumbler, Facebook or other sites, you’ll need to view Tracking the Light at: http://briansolomon.com/trackingthelight/ for the correct (unmodified, compressed or cropped) perspective on this image.
It was exactly two years ago; on this day, January 23, 2014, I made this tightly composed portrait-view (vertically oriented) photograph of a SEPTA Silverliner IV at Overbrook, Pennsylvania.
Over the years I’ve made many photographs along the former Pennsylvania Railroad Main Line, and more than my fair share of views at Overbrook.
SEPTA’s Silverliners are common enough, so I tried something a little different. Using my Canon EOS 7D with 200mm telephoto, I composed a tight vertical image of the SEPTA train as it glided through the station.
This is the full-frame portrait oriented view as I exposed it on January 23, 2014.
Recently, the TRAINS Newswire published a story on MBTA’s Mattapan-Ashmont Trolley line warning of the possible demise of the historic PCC cars and possibly of the trolley line itself. (The ‘bus’ word was uttered!)
So, the word is out, if Mattapan-Ashmont Trolley is something you want to see, DON’T Wait.
I recalled an early visit to this line with my father on a May Sunday in 1979. This was back when former Dallas double-ended PCCs dominated operations on the line, and the cars were largely painted red to reflect their operation as an extension of the Red Line.
Today, I find it fascinating to look back on these photos. I couldn’t have anticipated back then that more than 36 years later, old PCCs would still be working the line, albeit with different cars.
This old Type 3 car caught my attention. I’d seen these on the Green Line years earlier and always want to inspect one up close.Since my 1979 visit MBTA eliminated the classic trolley shelter at Mattapan and sent many of the double-ended cars to the scrapper.
However, from strictly a photographic point of view, what is now most interesting to me is that I knew virtually nothing of the ‘rules of photography’ , other than a rudimentary understanding of how to work my father’s Weston Master III light meter and translate the settings it offered to my Leica 3A.
No one had ever told me about three-quarter angles, or where the sun was ‘supposed to be’. Front-lighting, back-lighting, and side-lighting were foreign words. I was blind as to the relative importance of foreground and background, and I didn’t known that ‘good’ photos were only made with Kodachrome, and I knew nothing about the compositional ratios of 2/3s, or any of the other stuff that later influenced my photography.
Here were trolley cars and lots of them. What’s that Green car doing back there I wondered?
Honestly, as record of the scene, my raw unfettered, uninformed approach has a great appeal to me today. Had I known those things, I may have exposed less interesting images.
What you see here are the inspired views of an enthusiastic 12-year old exposed using a Leica with a 50mm Summitar lens on Ektachrome film.
Another view of the snow plow. Too much foreground? Lighting all ‘wrong’, just pitch this one in the bin.If the cars are double-ended, why do they spin them around on a loop. I couldn’t make heads or tails of this.I might not have known what I was doing, but I was visionary. I was fascinated by the ‘heavy rail’ tracks on both sides of the trolley line. Here is evidence that Conrail was still serving the former New Haven branch as far as Milton. There’s virtually no evidence of the freight operation today, and it takes a bit of imagination to figure out where the tracks were. Notice that I didn’t allow a PCC to interfere with the scene: this was about the PFE refers!